Category: Instincts and Intuition Blog–(click on the photo below for the full post)

Musings by a subversive stitcher…. As I am a self-taught artist, you will not get a lot of academic theory or art history here, just me, trying to explain myself. Or at least ask good questions.

Quilting Tip #10: When Bobbins Break Bad

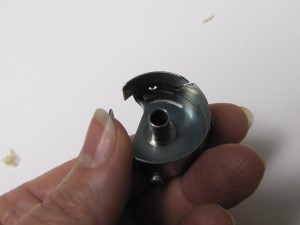
Bobbin thread breaking?  This will usually happen with longarm machines that have the larger ‘M’ style bobbins and when your quilting design has a lot of changes in direction.  The problem is called backspin and it will give you heartburn.  It means the bobbin is running so fast, it spins too fast in the bobbin case when you change directions in your stitch line.  The heavier/larger your bobbin, the faster you are going, the more changes in direction, the more likely this problem will occur.

I hate when that happens.

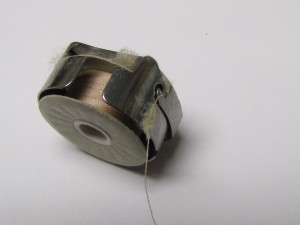
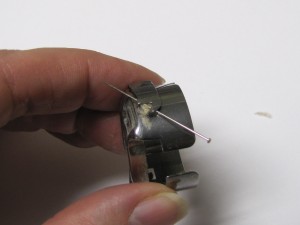
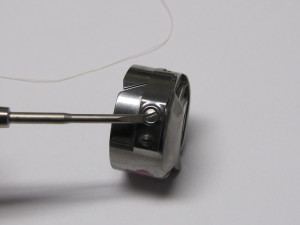
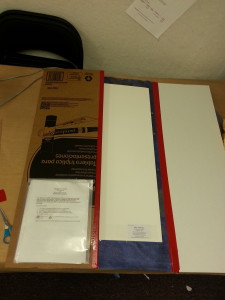
I found I could eliminate this problem almost entirely with pre-wound bobbins (available–way it with me–at Superior Threads).  They are lightweight and don’t have the backspin that heavier metal bobbins do.  Note:  I have to peel away the side of the cardboard bobbin that faces me as I put the bobbin in the case in order to fit it into my A-1 machine.  I never had to do that for my Gammill until recently.

I also use this trick when I put pre-wound bobbins in my Bernina 930 for piecing, but I remove BOTH bobbin sides for the Bernina.  Experiment to find what works best for you.

Note:  Be careful with your bobbins.  Try not to drop them.  Both metal and cardboard can bend out of shape and will increase your bobbin tension.  Don’t get the cardboard kind wet with water or oil.  That can also distort the bobbin, too.

Tomorrow’s topic:  what kind of thread to use.

Quilting Tip #9: When Needle Meets Thread/Can this Relationship be Saved?

Before you begin quilting, you have to know if your needle and thread like each other.  Do they have a good relationship?  Can they play nicely?  Will they get along all the way through your quilt?  Or do they play nicely for a few inches, and then tear each other apart?

It is very important to follow the thread manufacturer’s recommendations (if they are offered) regarding needle size for the different threads you use.  For ‘quilting’ threads, which are thicker than most piecing thread, and metallics with a polyester core, a topstitch needle (sizes 18-21) will often be your best bet.  A size 18 will accomodate most, but not all, threads on the market.

If your needle has too small an eye, your top thread will shred.  If you are having this problem on either a domestic or longarm machine, get a larger needle.

As a bonus, the bigger your needle the less ‘deflection’ you will have.  Deflection is the tendency of the needle to flex while moving, especially when you are changing direction as you stitch.  It can mess with your stitch quality, too.

Some people (I am talking about you, my fellow Type As) notice that larger needles leave larger holes, and finer threads don’t fill those holes as nicely.  I suspect those people don’t wash their fabrics before quilting.  The sizing in fabrics make them papery and the holes won’t ‘heal’ as readily.

One reason I like Superior Threads is that they have a recommended needle size for EVERY thread they sell printed right on the thread cone for both home and longarm machines.  How convenient is that?

What size needle do you use?

Quilting Tip #8: Burs under your Saddle

Another cause of top thread shredding can be caused by a broken needle: a ‘bur’  on the thread path.  A ‘bur’ is a tiny bit of displaced metal, made when your needle hits anything but the hole in the throat plate it is supposed to go through.  It is when your formerly pointy needle gets flattened at the end.  That metal goes somewhere, and it becomes a bur.

Yes, this is just as bad as a bur under your saddle….

You will find the bur on the tip of your needle, and whatever your needle hit.  If the bur is on your needle, replace it.  If your thread path has a bur on it, you need to buff that out.

Over time, and after a needle break, a bur can form anywhere along the thread path, so you need to search carefully, feeling along the thread path with a nylon stocking over your finger to see if it snags anywhere.

If the stocking snags, you know you have a bur.  Buff out the bur with a fine grit (800 or so) sandpaper.

Happy trails!


Quilting Tip #7: Hot Stuff and Idiosyncrasy

Who knew?  Thread shredding can also be caused by an overheated needle.  You may find that some of the lustrous, beautiful, finer trilobal polyester threads (and yes, I am talking about Rainbows here, among others) will shred while you are going at high speeds.  If this is happening to you, get your needle going at top speed for a good while while threaded, then stop the machine and touch your needle.  Is it very hot?  That may be your culprit.

You have a few options.  One is slowing your machine down–both you, if you have a stitch regulator, and the machine, if you are using a high ‘cruise’ speed.  Increasing your stitch length can help (longer stitch length = fewer stitches = slower speed).   That’s easy to say, not so easy to do.

Another option is to switch to cotton or silk thread, which won’t be quite as affected by higher temperatures/speeds.

It also helps to understand that this problem will be worse stitching from right to left–and especially from front right to back left–as you face the machine.  It is just one of those idiosyncrasies of design that can make you idiosyncrazy.  (Hey, I think I just made up a new word!  def:  adj., both idiotic and crazy simultaneously)  So, avoid stitching towards the left for long periods.  You can try stitching a line from left to right, ending the stitch line, and starting the next one left to right again (instead of stitching right to left).

What makes you idiosyncrazy about quilting?  I will try to answer it in a future post!


Quilting Tip #6: The Dreaded Thread Shred

Is your top thread shredding, as opposed to snapping cleanly at the end?  This can be caused by many things.  If you have broken a needle recently, your machine could be out of time.  In order to accomplish the magic of a perfect stitch, a whole lot of pieces-parts (needle, threads, hook, etc.) need to come together at exactly the right time in exactly the right place in relation to each other.  It’s mind-boggling, really.  Then a miracle happens:  a stitch.

Breaking a needle, especially with a longarm, can cause your machine to go ‘out of time.’  When this happens, your thread will shred all over the place.  This is not a happy occasion!

Some longarmers learn to re-time their machines themselves (see your manufacturer for instructions).  Show-offs!  I bite the bullet and call my local sewing machine repairman and pay for the house-call.  Thank goodness for Jerry at Cathey’s Vac and Sew.  He saves me time, frustration, and I don’t have to dismantle my machine to bring it in.  Worth every penny.

Do you have a favorite video that shows how a stitch is made?  Please let me know!  And stay tuned tomorrow for more reasons why thread can shred….

Quilting Tip #5–Blasphemy!

Another tip for the bobbin case:  If  you are having inexplicable problems with too-high bobbin tension, try carefully running a very fine straight silk pin under the thread guide of the bobbin case, from back to front.  Lint will frequently build up here and it is usually impossible to see without removing the guide and/or removing the bobbin from the case and looking inside.

Yes.  I admit that this is an unorthodox way to remove lint.  Bless me father, for I have sinned…  But it is the most surefire way to remove all the lint I can’t see.  I have never had a problem ruining a bobbin case this way, and I have used this method literally thousands of times.

Okay, you must be VERY careful not to scratch the metal of the bobbin case along the thread path.  (This is why you need a very fine pin.)  Start at the back of the thread guide, where there is a slight gap between the guide and the bobbin case.  Pull the pin underneath the guide along its length.  If you have been using a low-mid quality thread, you will have quite a lint ball, as in the photo.  You will have less if you have been using an extra long staple Egyptian cotton, for instance.

This series of photos shows you how to clear lint from your bobbin case.

Here the bobbin case is removed from the machine.  We can suspect there is some serious lint inside based on what we see here.
Here the bobbin case is removed from the machine. We can suspect there is some serious lint inside based on what we see here.


Oh, yeah.  There's a big clot of lint where the thread meets the metal.  We didn't see that from the outside of the bobbin case, did we?
Oh, yeah. There’s a big clot of lint where the thread meets the metal. We didn’t see that from the outside of the bobbin case, did we?


Now here is the blasphemy:  insert a fine IBC silk pin where there is a gap between the adjustable guide and the bobbin case.
Now here is the blasphemy: insert a fine IBC silk pin where there is a gap between the adjustable guide and the bobbin case.
Pull the pin along the guide.  It will drag the lint with it.  Sometimes you need to do this 2x to get all the lint.
Pull the pin along the guide. It will drag the lint with it. Sometimes you need to do this 2x to get all the lint.


Now the big clot is gone.  You need to check the other nooks and crannies; blow, brush, or tap the remaining lint from the case and you are good to go.
Now the big clot is gone. You need to check the other nooks and crannies; blow, brush, or tap the remaining lint from the case and you are good to go.

Can you forgive me?

Quilting Tip #4 Double, double, no oil means trouble….

If your machine sounds like it is playing Jingle Bells for you, you should really oil your hook.  Oil it at least every other bobbin.  Once oiled, run your machine with thread for 6-10 inches of stitching on a scrap of fabric or batting.  You will notice that your thread picks up the excess oil, and you do not want that on your quilt.  If you do get oil on a quilt, pat a bit of cornstarch on the stain along the stitch line.  Leave it for at least an hour (overnight is fine, too) and then brush it away.  You will be quite relieved to find the oil spot has disappeared….

Add a drop of oil right here:

Here, the hook has been removed from the shaft for easy viewing.  You want to oil the 'tongue' right where indicated, so it glides smoothly in the groove.  Rotate your flywheel to get the oil right where you need it.
Here, the hook has been removed from the shaft for easy viewing. You want to oil the ‘tongue’ right where indicated, so it glides smoothly in the groove. Rotate your flywheel to get the oil right where you need it.

Oh, and uh, my apologies to Shakespeare…

Quilting Tip #3…and the lies they tell

Ladies, we have been lied to all these years:  THE WORLD WILL NOT COME TO AN END IF YOU ADJUST YOUR BOBBIN TENSION.  This goes for longarm, midarm, and domestic sewing machines.  I don’t know why this lie got started.  Did it have something to do with sexism?  Were women considered too hairbrained to handle a screwdriver?  Perhaps adjusting bobbin tension would adversely affect the ovaries?

I do not blame Mrs. Gaska, my 7th grade home economics teacher, for telling me this lie.  I am sure ‘they’ lied to her too.  Feel free to use an eyeglass screwdriver to make incremental adjustments to your bobbin tension (righty-tighty, lefty-loosey), especially if you tend to run different weight threads in your bobbin.

Adjust the screw here with a screwdriver from an eyeglass repair kit.

As a general rule, I run my bobbin thread as loose as possible on my longarm–much looser than the manufacturers’ typical recommendation.  This means I am less likely to have too-tight tension on the back of the quilt, where I can’t easily see it until I have quilted way too many stitches to want to remove.

What lies have the quilt police told you?


Quilting Tip #2: How Quilting is like Voting

Okay, now for some practical information.  Thread tension is the bane of every quilter.  It is important because it affects the long-term durability of your quilt, and is an important part of quilt show judging criteria (more on that in another post).  If your tension is unbalanced, those stitch lines are not as secure as they should be.  If the thread that is lying flat breaks, the stitches will loosen and fall out.

Getting and keeping good thread tension is your goal and some days will be better than others on that score.  It helps to have a basic understanding of how thread tension works.  The folks at Superior Threads have a TON of great information, including this diagram on the tug of war between top and bottom thread tension.  (FYI, I do not get paid by Superior Threads, but I am a big fan.  They carry a wide variety of very high quality thread.)

Note that BALANCED tension is what is important, and the only way to know if your tension is balanced is to look for top thread pulling to the bottom, or bobbin thread pulling to the top of your quilt.  Run your finger along the stitch line.  Does it feel smooth, or bumpy?  If it is bumpy, or you hear your fingernail running along the stitch line, you need to adjust your tension.

Here’s a little sample quilt I use in my classes showing balanced and unbalanced thread tension:

This sample shows how balanced tension looks from the top of a quilt.

Notice the ‘eye lashes’ on stitch line 2?  Bad, bad, unbalanced tension!

Notice how stitch line 3 looks a lot like the balanced tension on stitch line 1?  That’s because the bobbin thread tension is too high/tight and the top thread is pulling to the back of the quilt.  You can’t see the problem while you are quilting, only when you stop to look at the back.  This is the most diabolical of all tension problems.

So the lesson for today is, test for tension just like you vote… early and often.

What is your best test for stitch tension?

Quilting Tip #1

Homage
This quilt won the 2012 Longarm Quilting prize for a Wall-Sized Quilt at AQS in Paducah

I am a mixed-media textile artist and longarm quilter in Tucson, Arizona.  Since 2004, I have quilted over 1900 quilts for clients and myself.  My quilt Homage won the 2010 Handiquilter Longarm Workmanship Award at the American Quilters’ Society show in Paducah. In honor of National Quilting Month, I will be blogging a quilting tip each day.

Tips will range from the technical to the artistic, from loading a quilt on a longarm machine to how to quilt for show.  They are not in any particular order.  Some have videos or photos attached to them.  I will share everything I have learned in ten years and hope these tips help you, whether you are an art quilter, traditionalist, whether you quilt on a longarm or domestic machine.  Enjoy, and share it freely (just ‘spell my name right’), and please share your own tips as well….

Tip #1:  Practice, practice, practice. Okay, so this first tip is not very sexy, but it needs to be said nonetheless.  I took my first longarm quilting class from Nicole Webb one week after I got my quilting machine.  Obviously, I had the figurative training wheels in that class.  Nic–and everyone else–was really nice, but of course I was not happy with my quilting compared to the rest of the group.  When the two-day class ended, I vowed I would learn how to do a pretty feather if it killed me.  For two and a half days straight (that’s 20 hours) I did nothing but practice feathers.  First on a white board, and when that got boring, I went to the quilt machine.  It took 20 intense hours (and a bolt of muslin) as a total newbie to master a nice basic feather, which is admittedly a pretty complex shape.  

If I had had more experience with doodling simpler shapes, or any experience drawing, it would not have taken as long.  It  would surely have taken longer than 20 hours if I had practiced only one hour per day.   I have had people look at my work in quilts like Homage and assume it was done by computer because it is so ‘perfect.’  When asked how long a piece like this takes to make, I say “About 4 weeks, plus 10,000 hours of practice!”  A skill like quilting needs to get in your brain, and in your muscle memory.  Keep this in mind as you try to master any new skill.  

Once you have mastered the skill, keep practicing, even if it is only 20 mins every other day.  If you don’t use it, you will lose it.

How long did it take you to master quilting?


On killing my boyfriends….

The first class I took with Jane Dunnewold was a kind of survey course in surface design.  We started with dyeing and overdyeing fabrics, and then progressed to painting, foiling, etc.  It was a revelation for me.

On the second morning, after my first day ever of dyeing fabrics, Jane got the class together to talk about ‘boyfriends.’  You know, those fabrics that come out of the dyebath just perfect.  It is love at first sight.  You want them just the way they are.  You will love them forever.  And you never ever want them to change.

The author William Faulkner advised you must kill all your darlings, and Jane was suggesting just that!  Put them in a discharge bath.  Or another dyebath.  Or paint them.  Or something else.  Her point was that the first boyfriend is just a start and you can always find another boyfriend, just as cute.  Or maybe even cuter.

In my last dye-a-thon,  no less than FOUR new boyfriends came out of the dyebath like a Botticelli Venus.  Here they are.

Boyfriend 1 is lovely but probably to graphic a background for my samaras series.  He is a linen/cotton blend.  I plan to manipulate him and dump him in another discharge-and-dyebath.
Boyfriend 1

Boyfriend 1 is lovely but too loud a background for my samaras series. He is a loose weave linen/cotton blend. Not sure he will take paint or other processes well.  I do plan to manipulate him and dump him in another discharge-and-dyebath.  Perhaps he will adorn some clothing someday.

Boyfriend 2
Boyfriend 2

Boyfriend 2 is discrete.  Subtle.  Elegantly understated.  Arching stitchlines create the pattern in a lighter blue-green color.  This is the one I can change with the least amount of regret.  So I will.  Problem is, he is silk broadcloth, and will not take too many discharge/dye processes before he is ‘spent.’  I have to be careful not to overdue it with him, because I won’t have infinity chances to get him right.

boyfriend 3
Boyfriend 3

Now, I REALLY like Boyfriend #3.  I love his angles and geometry.  The subtlety and more defined random pattern.  He is definitely my style and someone I can really work with.  He’s silk broadcloth, too.  Do I dare do anything else to him?

And I saved the best for last:

The love of my life?

Fuschia Boy started out as black cotton fabric.  Manipulated in a crazy, freeform energetic stitched pattern.  Discharged.  Dyed in my favorite color (okay, that was a mistake.).  Love his little mirrored images.  The crazy overall chaotic pattern.  The subtle color changes and not-so-subtle ones.  Today, he is my favorite.

But there is this nagging doubt:  Am I selling myself short?  Is he really this perfect?  Can I make him better?  Can I combine what I love about boyfriends #3 and #4 to make a long term commitment, settle down, and make a quilt together?

What do you think, girlfriend?


Ready for the Show….well, almost.

Sunset on the Swan, 32'' x 16''
Sunset on the Swan, 32” x 16”

Brand new work ready to hang in the booth?  Check.

New teaching brochure?  Check.

Sleeves on the new class samples?  Check.

Falling for You, 20'' x 15''
Falling for You, 20” x 15”

Gorgeous new Shibori Chic clothing stitched, discharged, and dyed?  Check.


This Shibori Chic camisole was stitched, discharged, and overdyed and is a great project for a 4 hour class.

E-newsletter sent?  Check.

There is lots to do to get ready for the quilt show.  I still have to quilt a few small pieces, and tag and package the merchandise, but I am almost ready for the big show this weekend.  The quilt show is always so much fun.  I am so looking forward to hanging out with my friend Patricia Hasting-Sargent and talking to people about my work.  Will I see you there?

Off the Wall Options for 3D Art Quilts

I have just finished working up two class samples for a 3D Quilt class I am developing.  My brain has been working out the possibilities for different types of 3D projects for beginning art quilters, or those who work with commercial fabrics.  The fabrics for both these projects were lurking in my stash.  I can’t believe how well the landscape quilt fabrics work–they are not even from the same line….  The possibilities for creative embellishments are endless!

I think either one of these would make a good class project, don’t you?

Southwest Vistas, 18'' x 42''
Southwest Vistas, 18” x 42”

Southwest Vistas detail

Falling for You, 20'' x 15''
Falling for You, 20” x 15”


On Kitsch, Quixote, and Angels

It is always a good day in the studio when I get to open the dyepot and pet some new fabrics.  This week I was exploring some shibori techniques I learned over the summer and I spent part of the day perusing the results.  Looking closely at the details.  Planning the next process.  Is the fabric ready for a discharge bath or another layer of dye?  Or does it only need a bit of paint and quilting to finish?  Is the piece destined to remain whole, or be cut into several smaller works?  Which side of the fabric do I like best?  Do I want to see what the same technique does for a different type of fabric?  So many questions to ponder.

It was with a jolt then that I realized that there was an angel in this fabric I have been pondering now for days.  She (do angels have a gender?) is small, about three inches tall.  She is standing in front of a rainbow.  I am not making this up.  Under two white doves, no less.  I tell you, it does not get more kitschy than this:  the top three trite images you can think of, sitting there on my stitch dyed silk.  And I certainly did not plan one treacly iota of it….

In the midst of rust-dyeing one day, my friend Peggie found Don Quixote and his sidekick looking strangely reminiscent of this famous sketch by Pablo Picasso.   That is really cool.  But Pablo wasn’t haunting my dyepot….  It was the Angel of Sweetness and Light.  I don’t know whether to put her on my design wall as the patron saint of my studio, hand quilt her into oblivion and sell her for double the price of my other little gems, or banish her into a boiling discharge bath….what would you do?  

If only I could figure out how to get a pony, a cat, and a heart in there.....
If only I could figure out how to get a unicorn, a cat, and a heart in there…..
The Samarium Chronicles:  Top Secret–Classified

The Samarium Chronicles: Top Secret–Classified

One year later, my piece for the Studio Art Quilt Associates’ exhibition Radical Elements is complete.  It is a huge relief to have the work done, photographed, and shipped to Ohio, where it will stay until its debut in May in Baltimore.  When I applied to be a part of the exhibition, I did not realize the pressure I would put myself under to complete the piece.

When you apply to most shows, you submit photos of a finished work.  If the juror(s) like it, it gets in.  If they don’t, you apply somewhere else.  For this exhibition, artists were accepted based on their portfolios.  Then we made work specifically for submission to the exhibition.  So you have to make a terrific piece and hope it lives up to your reputation.  Hope that it holds its own next to that of the other artists.  Yikes.

I won’t do that again–anytime soon anyway.

What ‘radical elements’ did I use in the piece?  Archival tyvek collaged with decorative papers.  A medical exam glove.  Window screen.  Magnets.  Guitar strings.  Some of these elements evoke the uses of Samarium.  Others allowed me to use my surface design techniques without fabric.  I included my new favorite technique of designing a portion of the piece to fall forward off the wall with gravity.  Radical indeed, don’t you think?

I can’t show you a full photograph, but here are some teasers:

My journal for the Radical Elements show includes some of the elements in the piece.  I was conflicted about including this, because I like viewers to come to their own conclusions about a work.  I don't like to 'give too much away,' in a sense.  It is kinda cool when art inspires a sense of wonder.
My journal for the Radical Elements show includes some of the elements in the piece. I was conflicted about including this, because I like viewers to come to their own conclusions about a work. I don’t like to ‘give too much away,’ in a sense. It is kinda cool when art inspires a sense of wonder.
It took 2 days just to design and make the packing materials for the work.  The magnets proved really tricky to deal with.
It took 2 days just to design and make the packing materials for the work. The magnets proved really tricky to deal with.
Ready for the road...and an address label.  I think I skipped out of the FedEx office....
Ready for the road…and an address label. I think I skipped out of the FedEx office….


detail, 'Samarium 62:  No Relation'
detail, ‘Samarium 62: No Relation’

If you see me in person I can show you a full size picture….  Have you ever finished an imporant piece ‘just in the nick of time?’


Fun and Shibori Fabric on Whidbey Island

I spent a week on Whidbey Island with Elin Noble and 14 other artists learning the art of shibori while discharging and dyeing fabrics.  It was wonderful!   We tried clamping, stitching, arashi (pole-wrapping) and masking a raft of different fabrics:  silk dupion, cotton, rayon twill, etc.

Elin is very knowledgeable about the chemistry of the dyeing and discharging process.  Armed with that knowledge, you can analyze what happened on a piece of fabric, and predict what will happen on another.  How great is that!?

Here are a few of my favorite pieces from the week:

This intriguing piece was dyed, folded and stitched, discharged and over-dyed.  I will definitely play with this technique.
This intriguing piece was dyed, folded and stitched, discharged and over-dyed. I will definitely play with this technique.


This piece of silk dupion was discharged, overdyed with Procion dyes, discharged, wrapped around a rope and then dyed in purple acid dye.  Love the shimmery, water look to this....
This piece of silk dupion was discharged, over-dyed with Procion dyes, discharged, wrapped around a rope and then over-dyed in purple acid dye. Love the shimmery, watery look to this.
This shibori-clamped fabric was discharged three times and dyed three times.


This piece started as orange hand-dyed rayon.  I then wrapped it on a pole (arashi shibori), discharged and over-dyed it.  Then I masked off the circles and dyed it again.  This has possibilities, too, don't you think?
This piece started as orange hand-dyed rayon. I then wrapped it on a pole (arashi shibori), discharged and over-dyed it. Then I masked off the circles and dyed it again. This has possibilities, too, don’t you think?

The setting was beautiful.  This is not a postcard–it is an actual picture I took from the deck of the Cottage on the Cove:

This was my view one sunny morning.  Coupeville on Penn Cove of Whidbey Island is a beautiful place.
This was my view one sunny morning. Coupeville on Penn Cove of Whidbey Island is a beautiful place.

Sometimes I think I am the luckiest person on Earth.

After a week on Whidbey Island, I spent a week in Seattle, and visited the Seattle Art Museum AND the La Conner Quilt Museum.  More on those wonderful outings later….

What’s the Alternative?

whats the alternative
“What’s the Alternative?” 2013, 13” x 16”


This piece is a small ‘quilted’ collage made from window screen, kozu and lace papers with digital and hand-printed images, layered and stitched.  With cutouts and found objects.

Inspiration at the Surface Design Association Conference

The 2013 SDA conference was a terrific and inspiring program with artists on the cutting edge in their respective fields.  These are just three of my favorites.

Otto von Busch discussed his fashion hacktivism (check it out here).   He offered intriguing ways to subvert the ‘fashion industrial complex.’

Kim Bruning spoke about how she puts electronics into textiles.  One project she completed was a leather jacket for a blind woman that would sense objects within 30 inches and vibrated the collar so the wearer could discretely avoid a ‘collision.’  For info on how she works and DIY, click here.  

Another speaker was Janet Echelman, who has collaborated with computer graphic designers and textile manufacturers to create her gorgeous permanent outdoor textile sculptures.  She has a piece in Phoenix, and I plan to see it the next time I am in town.  A link to her TED talk is here.  

In addition to a phenomenal speakers program, several galleries around San Antonio featured some outstanding member work.  These are just a few of the pieces that caught my eye.  Which one is your favorite?

Residue #9 (Why I Wake Early) by Elise Deringer
Residue #9 (Why I Wake Early) by recent ASU MFA grad Elise Deringer. She pours thickened dyes into sheer ‘bags’ and then batches them.
20130606_135324
William Billy George from the Appalachian Center for Crafts submitted his piece ‘Secret’ to the juried student show. What you can’t quite make out are words written onto this paper before it was folded. It makes me want to take it apart….


'Duality' by SDA member Naomi Adams.  Wish I could figure out how she did this!
‘Duality’ by SDA member Naomi Adams. Wish I could figure out how she did this!
Natalya Aikens' Glass Bridge.  Wonderful use of thread and perspective in this piece, don't you think?
Natalya Aikens’ Glass Bridge. Wonderful use of thread and perspective in this piece, don’t you think?

Already planning for the next conference in Tulsa in 2015.  


Lucina Lighting the Way

Lucina Lighting the Way, 2013, 24'' x 24''
Lucina Lighting the Way, 2013, 24” x 24”

Quilt for Change  recently asked me to submit a piece for their Light, Hope, and Opportunity Challenge.  The project raises awareness about the Solar Sisters program, where African women entrepreneurs are given loans to start their own businesses.  They buy inexpensive rechargeable solar lights to sell in their communities.  This means fewer costly and dangerous kerosene lanterns in African villages.  What a great cause!  The exhibition will start in Geneva next month, and hopefully travel to the US.

I have been thinking about burning the edges of a piece for a while, and this seemed like an excellent opportunity.

Here is my artist statement for the piece:

Lucina Lighting the Way

Lucina was the Roman goddess of light and childbirth:  She who brings children into the light.  Here, the pregnant goddess holds a golden orb.  The lively color scheme and bright shapes evoke a hopeful spring.  This quilt is a tribute to modern-day Lucinas, our Solar Sisters, who are bringing safe, affordable, solar-powered light to their friends and neighbors.  The singed edges are a reminder of the dangers of kerosene lanterns, which maim and kill users across Africa each year.  Hand-dyed, and printed linen, painted silk, layered and machine stitched.  Techniques include cutwork with a burned-edge finish.

detail:

'Lucina Lighting the Way,' detail
‘Lucina Lighting the Way,’ detail


UNBOUND Fiber Art Exhibition opens Saturday….

The Fiber Artists of Southern Arizona’s show UNBOUND opens at The Drawing Studio in Tucson on Saturday.  The show looks amazing, and the works include my 8′ skyscraper Channeling Gehry and Trish Hastings-Sargent’s new work, a sculptural Desert Tree that ‘floats’ along the wall.  My artist talk Confessions of a Subversive Stitcher begins at 5 pm Saturday.  The artists’ reception follows at 6 pm.  Patricia Hastings-Sargent will host a talk about how she creates her landscapes on Saturday, April 13 at 5 pm.

Click here for info on how to get to The Drawing Studio.  Events are free and open to the public.  The show runs through April 27, hope you can stop by and see it.

Here is a sneak peak of the show….

UNBOUND show 1


UNBOUND show 2


UNBOUND show 3