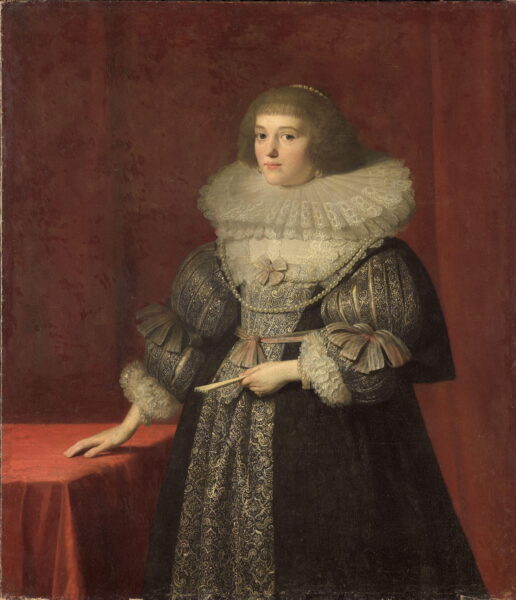
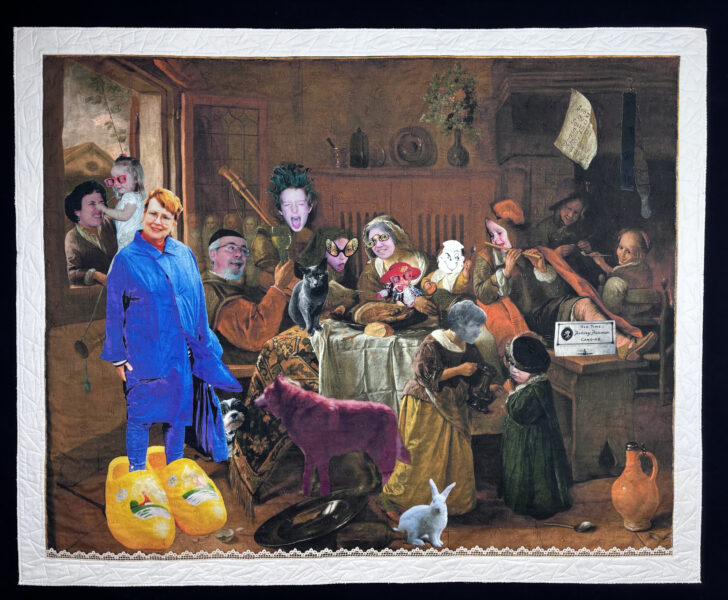
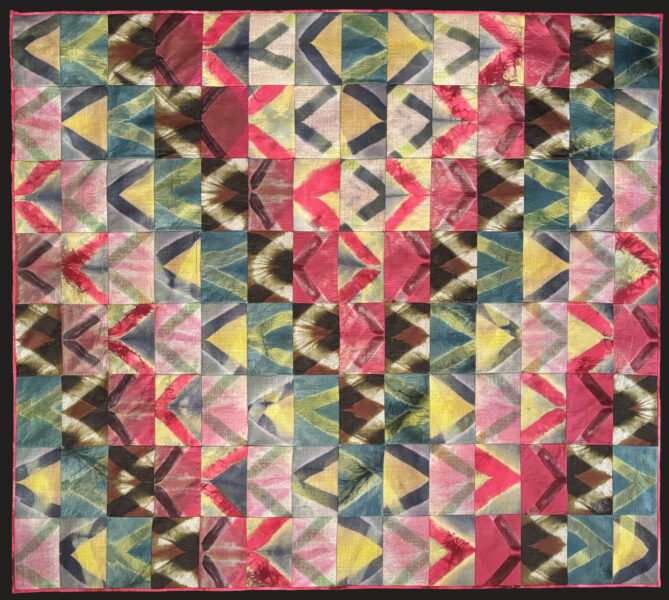
Countess Ursula’s stunning gown inspired me to create an homage to my Nana, Rosella Van Belle, my mother’s stepmother. Nana was the Martha Stewart of her day. She cultivated a lovely rose garden, was a great cook, dressmaker and needle worker. She hosted a magical Christmas Eve celebration throughout my childhood. It was always a highlight of my year.
Nana, (After Anonymous), by Mary Vaneecke 2026
The digital collage includes a picture of her grandchildren singing Christmas carols, her Singer sewing machine, a fantastic bit of handmade lace, and buttons, patches, and the cover of a needle packet from her sewing box. There is some of her best-loved cookies on the table, along with a Christmas stollen. She is crowned with one of her bracelets.
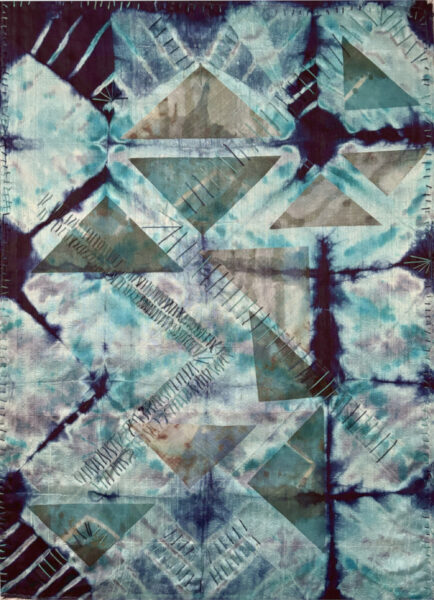
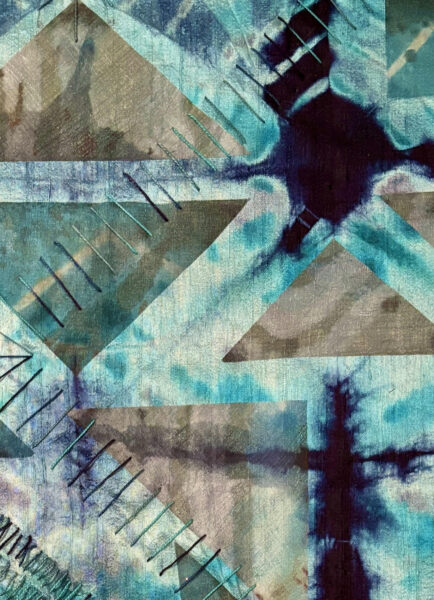
Where Do We Go From Here?/The Center Does Not Hold, detail. By Mary VaneeckeWhere Do We Go From Here?/The Center Does Not Hold, detail. By Mary Vaneecke
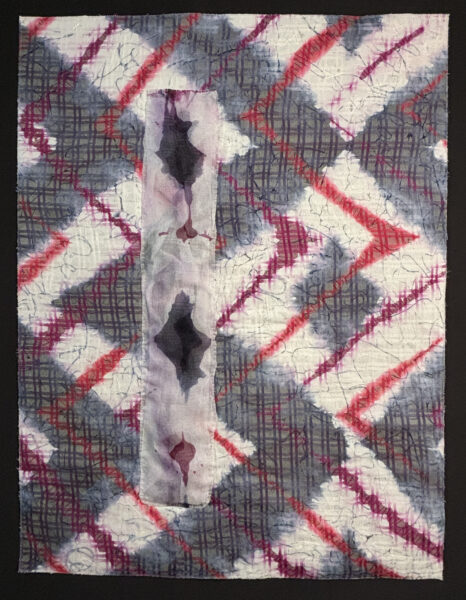
No, I don’t have 2 actual boyfriends. The first class I took with Jane Dunnewold was about applying color, line, and shapes to plain fabric. She warned us that some of us would come to her with our ‘boyfriends’–fabrics we had created and loved so much that we wouldn’t want to change them. I have been hanging on to these boyfriends for years, wondering what in the heck to do with them. Here I have appliquéd a sheer silk organza boyfriend onto a Fuji silk broadcloth that was dyed using a Katano shibori method. Hand stitched with single strand embroidery thread (this was really tough on my hands and I won’t be able to handwork an overall design again any time soon).
I kinda like the new guy. What do you think?
You can see the work at Agua Caliente Park in Tucson. Show details below. I am looking forward to a productive and art-filled 2024 with some new friends and exciting challenges. What is on your calendar?
Lint happens. You need to find the best way for you to clean lint from your bobbin area–this is crucial to maintaining good tension. Lint that is not directly on the thread path but is ‘hanging around’ your bobbin area could become dislodged and cause tension issues, so be proactive and get rid of it before it becomes a problem.
One way is with a brush. This can drive lint further into the works of your machine. Some prefer blowing onto the bobbin mechanism. This might cause water vapor to condense on your bobbin case, which can cause rusting if your machine is not used and oiled frequently. Air cans and even air compressors are other alternatives.
It is worthwhile to note here that polyester and silk threads can almost eliminate lint problems (cotton fabric and batting also produce lint, but not as much as cotton thread). An extra-long staple cotton thread like Superior’s King Tut brand will produce less lint than long staple cottons, too.
How do you get the lint out? Leave a comment, I would like to know!
Skipped stitches? Skipped stitches are a problem because they will catch on anything that moves across the quilt.
If you are quilting a batik quilt (or some other odd fabric), it is possible that your needle is not large enough to go through all the layers and seams of the dense fabric. If this is your problem, you will have skipped stitches over seamed areas, but not in other areas.
Try increasing your needle size. When I started using a #18 top stitch needle, I stopped having this problem on batik quilts.
You could also spray a light coating of silicon spray onto the backing (I do this onto the inside of the backing so that if at some point in the future the silicon discolors the fabric, it will not be on the top. This is not my preferred method because I don’t like the idea of putting chemicals on a quilt, especially a customer’s quilt.
Check to see how tightly the quilt is stretched on your machine. It should not be so taut that you could bounce a quarter on it! Check by ‘poking’ the quilt from below with one index finger. With your other hand, you should be able to grab the tip of your index finger through the quilt from the top. If you can’t do this, loosen the quilt a notch or two.
Otherwise, check that your machine is threaded properly and the needle is installed correctly. If that doesn’t work, check your timing.
You have to kiss a few frogs….or rather, into every quilter’s life some ripping must fall. Try as we might, there will always be days when we spend way too much time ripping stitches out (for you newbies, that is frogging = ripping, as in RIP-it, RIP-it). It takes 3-10 times longer to remove stitches than it does to make them. For this reason, it is really important to have a sharp seam ripper for the job.
Don’t try to do this job with your grandmother’s antique seam ripper from 1906. You need something with a fine and very sharp blade, particularly if your stitches are small. It is nice to have a slight curve to the blade–I find it helps to keep you from ‘stabbing’ your fabric as you remove stitches. My current favorite is from Superior Threads. At $30 it is a bit pricey, but lasts much longer than the cheaper ones….
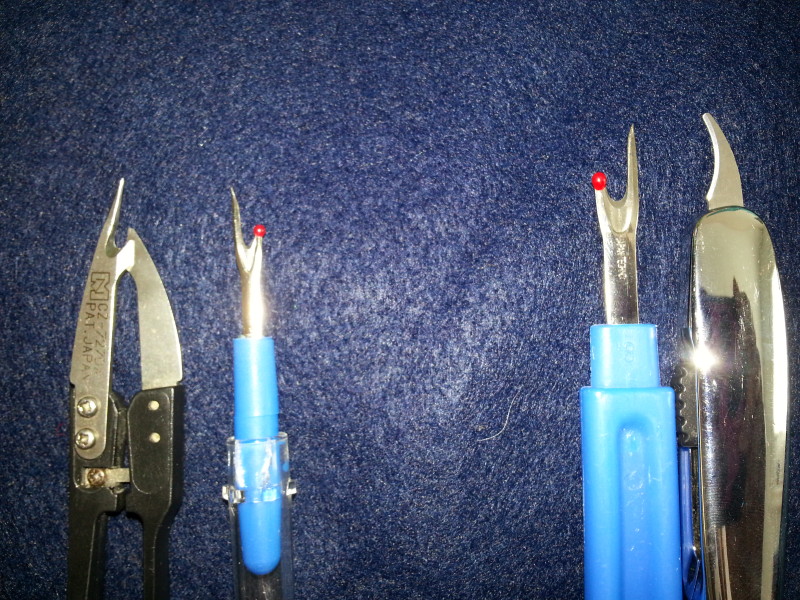
The 2 seam rippers on the left work best for ripping out stitches. The other work to cut thread.
My must-have specialized tool #372: A ‘manly’ magnetized dish from the hardware store for my pins. It’s huge, and sticks to various places on your machine when you need it to. If you do spill pins, it makes picking them all up easier.
It is usually cheaper than the silly plastic pink things with a tiny magnet that craft superstores sell. I also store my machine needles and screwdriver there, so they are convenient and easy to find for each machine.
This great little tool will stick to your rollers as you pin the quilt.
Stabilizing the quilt: This is pretty straightforward for most quilts. If you are using a domestic or George-type machine, you will want to pin or baste the top, batting and backing together. A longarmer can do this for you quickly and at a very reasonable price.
Chemical/glue/fusible basting is problematic because you are putting some kind of chemical on the quilt, and these have a tendency to gum up your needles.
Like many longarmers, I float the quilt top, which means I attach the backing only to the machine, layer on the batting and top and baste those edges down. I quilt the area under the machine throat, advance the quilt, and baste again as I go. The only time I have had a problem doing it this way is with large medallion quilts, where the borders get increasingly smaller as you approach the center. I sometimes ended up with pleats on the backing of larger quilts.
To avoid this heartbreak, I took a tip from Sharon Schamber and baste a stitch line across the width of the quilt each time I advance it, before that section is quilted. Works like a charm every time, no matter how densely I quilt the sections!
My least favorite part of the longarm quilting process is pinning the backing on the canvas leaders. With my velcro leaders, I can pin the quilt back to the machine more easily, and even do it while I am waiting for my IntelliQuilter to finish a row on another quilt or am out of the studio entirely.
Zipper leaders are another option, but velcro allows you to make slight adjustments in quilt back tension while the quilt is on the machine. Keep in mind that different leaders have different requirements that will affect the size backing you need to attach quilts to your machine.
There is yet another product on the market: Leadermate. Haven’t seen this one in action yet. Have you?
For side clamps, there are options like Snappers. I tried a similar product a few years ago, but it just didn’t last long before it split and was useless. Also, when a client brings me a short back, my machine was in danger of sewing right through the plastic. It did this a number of times, ruining my needle. I ended up going back to the tried-and-true clamping method.
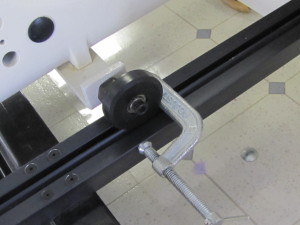
Longarmers: Want to be sure you have a straight edge along the top of the quilt, but don’t have a horizontal channel lock function on your machine? Use a small C-clamp like this on the vertical track of your machine. It will allow you to baste a stitch a long straight line on your batting for you to lay your quilt against. With one straight edge, you can square the others accordingly.
Of course, you remove the clamp before quilting.
Note: many great longarm machines do not have a channel lock feature on them. The channel lock is made with magnets, which are heavy. They add a lot of weight to your quilting machine, which may not be ideal for dense, custom quilting.
Yes, there are fancy laser lights that you can get, but this is cheap, easy, and you know you already have what you need in your garage.
The clamp is placed temporarily to allow a perfectly straight stitch line as a guide for your quilt edge.
These are just a few of the threads available on the market.
A word (okay, a lot of words) about choosing thread: some quilters are purists and want to use only cotton thread. This is fine (though not mandatory) if you are going for an ultra-traditional look. But be aware that our grandmothers used cotton thread because that was the only choice they had. Our foremothers were innovators just like us. They loved the new products on the market back then. They would have loved all the thread choices we have today.
I choose my thread based on the look I want and the quilt’s ultimate function. I take into consideration color, variegated v. plain, heavy v. fine, luster v. matte, and utility v. art. The thread content matters little as a general principle.
Quilters have been told a myth that polyester thread ‘cuts’ cotton fabrics. WRONG. Cotton is an organic material. It rots. Polyester thread and fabrics will stay bright and strong long after cotton fabrics have faded and shredded.
You just need to look at a vintage 1960s utility quilt to see the truth of that statement. The cotton fabrics will be faded and worn next to polyester and cotton/poly fabrics that look like they came off the bolt yesterday. It is the same with thread.
I once had a client tell me that a quilt she had made for her grandchild (quilted with cotton threads) fell apart after 2 years because the kid’s day care facility required a weekly sanitizing (read ‘bleaching’) of all blankies. She now makes sure to use a heavy polyester quilting thread for quilts that are going to be washed frequently.
A bonus with polyester thread and silk threads: less lint. Less lint = fewer tension problems. Can’t argue with that….
The trade-off with polyester is that while it is durable and you can run a finer thread through your machine than you can with cotton, cotton thread does not react to a hot/fast needle speed like polyester thread does.
So, I use all kinds of threads: fine (silk or polyester) for dense quilting, and cotton or polyester for utility quilts and less densely quilted work.
My motto: use the right thread for the quilt. What is your favorite? A luscious variegated? Lustrous silk? Hand-dyed cotton? Tell me!
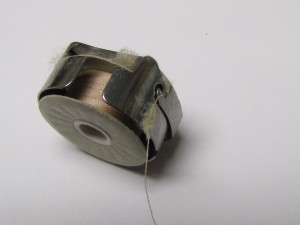
Bobbin thread breaking? This will usually happen with longarm machines that have the larger ‘M’ style bobbins and when your quilting design has a lot of changes in direction. The problem is called backspin and it will give you heartburn. It means the bobbin is running so fast, it spins too fast in the bobbin case when you change directions in your stitch line. The heavier/larger your bobbin, the faster you are going, the more changes in direction, the more likely this problem will occur.
I hate when that happens.
I found I could eliminate this problem almost entirely with pre-wound bobbins (available–way it with me–at Superior Threads). They are lightweight and don’t have the backspin that heavier metal bobbins do. Note: I have to peel away the side of the cardboard bobbin that faces me as I put the bobbin in the case in order to fit it into my A-1 machine. I never had to do that for my Gammill until recently.
I also use this trick when I put pre-wound bobbins in my Bernina 930 for piecing, but I remove BOTH bobbin sides for the Bernina. Experiment to find what works best for you.
Note: Be careful with your bobbins. Try not to drop them. Both metal and cardboard can bend out of shape and will increase your bobbin tension. Don’t get the cardboard kind wet with water or oil. That can also distort the bobbin, too.
Before you begin quilting, you have to know if your needle and thread like each other. Do they have a good relationship? Can they play nicely? Will they get along all the way through your quilt? Or do they play nicely for a few inches, and then tear each other apart?
It is very important to follow the thread manufacturer’s recommendations (if they are offered) regarding needle size for the different threads you use. For ‘quilting’ threads, which are thicker than most piecing thread, and metallics with a polyester core, a topstitch needle (sizes 18-21) will often be your best bet. A size 18 will accomodate most, but not all, threads on the market.
If your needle has too small an eye, your top thread will shred. If you are having this problem on either a domestic or longarm machine, get a larger needle.
As a bonus, the bigger your needle the less ‘deflection’ you will have. Deflection is the tendency of the needle to flex while moving, especially when you are changing direction as you stitch. It can mess with your stitch quality, too.
Some people (I am talking about you, my fellow Type As) notice that larger needles leave larger holes, and finer threads don’t fill those holes as nicely. I suspect those people don’t wash their fabrics before quilting. The sizing in fabrics make them papery and the holes won’t ‘heal’ as readily.
One reason I like Superior Threads is that they have a recommended needle size for EVERY thread they sell printed right on the thread cone for both home and longarm machines. How convenient is that?
Another cause of top thread shredding can be caused by a broken needle: a ‘bur’ on the thread path. A ‘bur’ is a tiny bit of displaced metal, made when your needle hits anything but the hole in the throat plate it is supposed to go through. It is when your formerly pointy needle gets flattened at the end. That metal goes somewhere, and it becomes a bur.
Yes, this is just as bad as a bur under your saddle….
You will find the bur on the tip of your needle, and whatever your needle hit. If the bur is on your needle, replace it. If your thread path has a bur on it, you need to buff that out.
Over time, and after a needle break, a bur can form anywhere along the thread path, so you need to search carefully, feeling along the thread path with a nylon stocking over your finger to see if it snags anywhere.
If the stocking snags, you know you have a bur. Buff out the bur with a fine grit (800 or so) sandpaper.
Who knew? Thread shredding can also be caused by an overheated needle. You may find that some of the lustrous, beautiful, finer trilobal polyester threads (and yes, I am talking about Rainbows here, among others) will shred while you are going at high speeds. If this is happening to you, get your needle going at top speed for a good while while threaded, then stop the machine and touch your needle. Is it very hot? That may be your culprit.
You have a few options. One is slowing your machine down–both you, if you have a stitch regulator, and the machine, if you are using a high ‘cruise’ speed. Increasing your stitch length can help (longer stitch length = fewer stitches = slower speed). That’s easy to say, not so easy to do.
Another option is to switch to cotton or silk thread, which won’t be quite as affected by higher temperatures/speeds.
It also helps to understand that this problem will be worse stitching from right to left–and especially from front right to back left–as you face the machine. It is just one of those idiosyncrasies of design that can make you idiosyncrazy. (Hey, I think I just made up a new word! def: adj., both idiotic and crazy simultaneously) So, avoid stitching towards the left for long periods. You can try stitching a line from left to right, ending the stitch line, and starting the next one left to right again (instead of stitching right to left).
What makes you idiosyncrazy about quilting? I will try to answer it in a future post!
Is your top thread shredding, as opposed to snapping cleanly at the end? This can be caused by many things. If you have broken a needle recently, your machine could be out of time. In order to accomplish the magic of a perfect stitch, a whole lot of pieces-parts (needle, threads, hook, etc.) need to come together at exactly the right time in exactly the right place in relation to each other. It’s mind-boggling, really. Then a miracle happens: a stitch.
Breaking a needle, especially with a longarm, can cause your machine to go ‘out of time.’ When this happens, your thread will shred all over the place. This is not a happy occasion!
Some longarmers learn to re-time their machines themselves (see your manufacturer for instructions). Show-offs! I bite the bullet and call my local sewing machine repairman and pay for the house-call. Thank goodness for Jerry at Cathey’s Vac and Sew. He saves me time, frustration, and I don’t have to dismantle my machine to bring it in. Worth every penny.
Do you have a favorite video that shows how a stitch is made? Please let me know! And stay tuned tomorrow for more reasons why thread can shred….
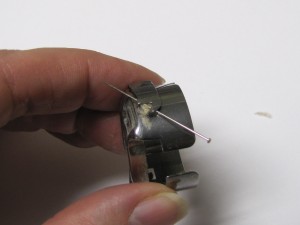
Another tip for the bobbin case: If you are having inexplicable problems with too-high bobbin tension, try carefully running a very fine straight silk pin under the thread guide of the bobbin case, from back to front. Lint will frequently build up here and it is usually impossible to see without removing the guide and/or removing the bobbin from the case and looking inside.
Yes. I admit that this is an unorthodox way to remove lint. Bless me father, for I have sinned… But it is the most surefire way to remove all the lint I can’t see. I have never had a problem ruining a bobbin case this way, and I have used this method literally thousands of times.
Okay, you must be VERY careful not to scratch the metal of the bobbin case along the thread path. (This is why you need a very fine pin.) Start at the back of the thread guide, where there is a slight gap between the guide and the bobbin case. Pull the pin underneath the guide along its length. If you have been using a low-mid quality thread, you will have quite a lint ball, as in the photo. You will have less if you have been using an extra long staple Egyptian cotton, for instance.
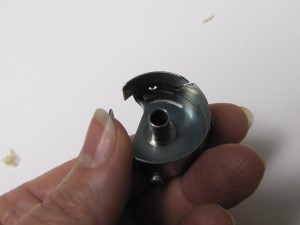
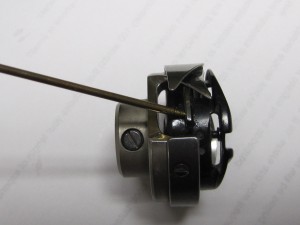
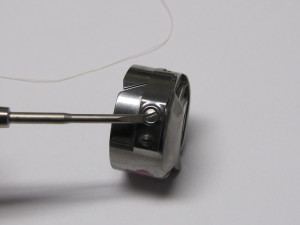
This series of photos shows you how to clear lint from your bobbin case.
Here the bobbin case is removed from the machine. We can suspect there is some serious lint inside based on what we see here.
Oh, yeah. There’s a big clot of lint where the thread meets the metal. We didn’t see that from the outside of the bobbin case, did we?
Now here is the blasphemy: insert a fine IBC silk pin where there is a gap between the adjustable guide and the bobbin case.Pull the pin along the guide. It will drag the lint with it. Sometimes you need to do this 2x to get all the lint.
Now the big clot is gone. You need to check the other nooks and crannies; blow, brush, or tap the remaining lint from the case and you are good to go.
If your machine sounds like it is playing Jingle Bells for you, you should really oil your hook. Oil it at least every other bobbin. Once oiled, run your machine with thread for 6-10 inches of stitching on a scrap of fabric or batting. You will notice that your thread picks up the excess oil, and you do not want that on your quilt. If you do get oil on a quilt, pat a bit of cornstarch on the stain along the stitch line. Leave it for at least an hour (overnight is fine, too) and then brush it away. You will be quite relieved to find the oil spot has disappeared….
Add a drop of oil right here:
Here, the hook has been removed from the shaft for easy viewing. You want to oil the ‘tongue’ right where indicated, so it glides smoothly in the groove. Rotate your flywheel to get the oil right where you need it.
Ladies, we have been lied to all these years: THE WORLD WILL NOT COME TO AN END IF YOU ADJUST YOUR BOBBIN TENSION. This goes for longarm, midarm, and domestic sewing machines. I don’t know why this lie got started. Did it have something to do with sexism? Were women considered too hairbrained to handle a screwdriver? Perhaps adjusting bobbin tension would adversely affect the ovaries?
I do not blame Mrs. Gaska, my 7th grade home economics teacher, for telling me this lie. I am sure ‘they’ lied to her too. Feel free to use an eyeglass screwdriver to make incremental adjustments to your bobbin tension (righty-tighty, lefty-loosey), especially if you tend to run different weight threads in your bobbin.
Adjust the screw here with a screwdriver from an eyeglass repair kit.
As a general rule, I run my bobbin thread as loose as possible on my longarm–much looser than the manufacturers’ typical recommendation. This means I am less likely to have too-tight tension on the back of the quilt, where I can’t easily see it until I have quilted way too many stitches to want to remove.
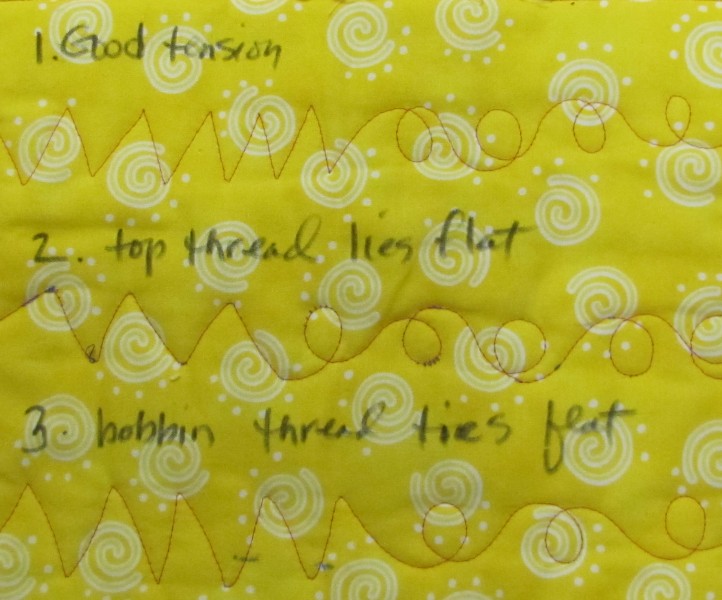
Okay, now for some practical information. Thread tension is the bane of every quilter. It is important because it affects the long-term durability of your quilt, and is an important part of quilt show judging criteria (more on that in another post). If your tension is unbalanced, those stitch lines are not as secure as they should be. If the thread that is lying flat breaks, the stitches will loosen and fall out.
Getting and keeping good thread tension is your goal and some days will be better than others on that score. It helps to have a basic understanding of how thread tension works. The folks at Superior Threads have a TON of great information, including this diagram on the tug of war between top and bottom thread tension. (FYI, I do not get paid by Superior Threads, but I am a big fan. They carry a wide variety of very high quality thread.)
Note that BALANCED tension is what is important, and the only way to know if your tension is balanced is to look for top thread pulling to the bottom, or bobbin thread pulling to the top of your quilt. Run your finger along the stitch line. Does it feel smooth, or bumpy? If it is bumpy, or you hear your fingernail running along the stitch line, you need to adjust your tension.
Here’s a little sample quilt I use in my classes showing balanced and unbalanced thread tension:
This sample shows how balanced tension looks from the top of a quilt.
Notice the ‘eye lashes’ on stitch line 2? Bad, bad, unbalanced tension!
Notice how stitch line 3 looks a lot like the balanced tension on stitch line 1? That’s because the bobbin thread tension is too high/tight and the top thread is pulling to the back of the quilt. You can’t see the problem while you are quilting, only when you stop to look at the back. This is the most diabolical of all tension problems.
So the lesson for today is, test for tension just like you vote… early and often.
This quilt won the 2012 Longarm Quilting prize for a Wall-Sized Quilt at AQS in Paducah
I am a mixed-media textile artist and longarm quilter in Tucson, Arizona. Since 2004, I have quilted over 1900 quilts for clients and myself. My quilt Homage won the 2010 Handiquilter Longarm Workmanship Award at the American Quilters’ Society show in Paducah. In honor of National Quilting Month, I will be blogging a quilting tip each day.
Tips will range from the technical to the artistic, from loading a quilt on a longarm machine to how to quilt for show. They are not in any particular order. Some have videos or photos attached to them. I will share everything I have learned in ten years and hope these tips help you, whether you are an art quilter, traditionalist, whether you quilt on a longarm or domestic machine. Enjoy, and share it freely (just ‘spell my name right’), and please share your own tips as well….
Tip #1: Practice, practice, practice. Okay, so this first tip is not very sexy, but it needs to be said nonetheless. I took my first longarm quilting class from Nicole Webb one week after I got my quilting machine. Obviously, I had the figurative training wheels in that class. Nic–and everyone else–was really nice, but of course I was not happy with my quilting compared to the rest of the group. When the two-day class ended, I vowed I would learn how to do a pretty feather if it killed me. For two and a half days straight (that’s 20 hours) I did nothing but practice feathers. First on a white board, and when that got boring, I went to the quilt machine. It took 20 intense hours (and a bolt of muslin) as a total newbie to master a nice basic feather, which is admittedly a pretty complex shape.
If I had had more experience with doodling simpler shapes, or any experience drawing, it would not have taken as long. It would surely have taken longer than 20 hours if I had practiced only one hour per day. I have had people look at my work in quilts like Homage and assume it was done by computer because it is so ‘perfect.’ When asked how long a piece like this takes to make, I say “About 4 weeks, plus 10,000 hours of practice!” A skill like quilting needs to get in your brain, and in your muscle memory. Keep this in mind as you try to master any new skill.
Once you have mastered the skill, keep practicing, even if it is only 20 mins every other day. If you don’t use it, you will lose it.
The first class I took with Jane Dunnewold was a kind of survey course in surface design. We started with dyeing and overdyeing fabrics, and then progressed to painting, foiling, etc. It was a revelation for me.
On the second morning, after my first day ever of dyeing fabrics, Jane got the class together to talk about ‘boyfriends.’ You know, those fabrics that come out of the dyebath just perfect. It is love at first sight. You want them just the way they are. You will love them forever. And you never ever want them to change.
The author William Faulkner advised you must kill all your darlings, and Jane was suggesting just that! Put them in a discharge bath. Or another dyebath. Or paint them. Or something else. Her point was that the first boyfriend is just a start and you can always find another boyfriend, just as cute. Or maybe even cuter.
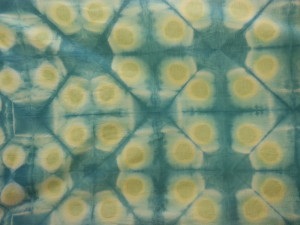
In my last dye-a-thon, no less than FOUR new boyfriends came out of the dyebath like a Botticelli Venus. Here they are.
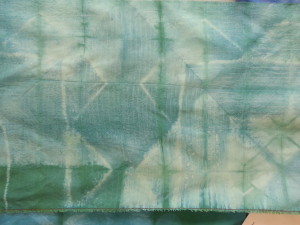
Boyfriend 1
Boyfriend 1 is lovely but too loud a background for my samaras series. He is a loose weave linen/cotton blend. Not sure he will take paint or other processes well. I do plan to manipulate him and dump him in another discharge-and-dyebath. Perhaps he will adorn some clothing someday.
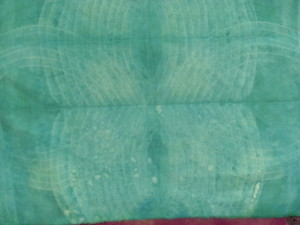
Boyfriend 2
Boyfriend 2 is discrete. Subtle. Elegantly understated. Arching stitchlines create the pattern in a lighter blue-green color. This is the one I can change with the least amount of regret. So I will. Problem is, he is silk broadcloth, and will not take too many discharge/dye processes before he is ‘spent.’ I have to be careful not to overdue it with him, because I won’t have infinity chances to get him right.
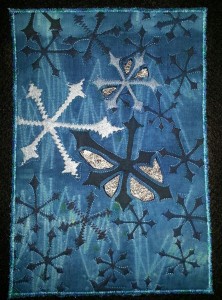
Boyfriend 3
Now, I REALLY like Boyfriend #3. I love his angles and geometry. The subtlety and more defined random pattern. He is definitely my style and someone I can really work with. He’s silk broadcloth, too. Do I dare do anything else to him?
And I saved the best for last:
The love of my life?
Fuschia Boy started out as black cotton fabric. Manipulated in a crazy, freeform energetic stitched pattern. Discharged. Dyed in my favorite color (okay, that was a mistake.). Love his little mirrored images. The crazy overall chaotic pattern. The subtle color changes and not-so-subtle ones. Today, he is my favorite.
But there is this nagging doubt: Am I selling myself short? Is he really this perfect? Can I make him better? Can I combine what I love about boyfriends #3 and #4 to make a long term commitment, settle down, and make a quilt together?
This untitled piece is 10” x 7” and will travel as part of the Studio Art Quilt Associates next trunk show. It is hand-dyed, screen printed, and embellished with painted fusible web.
This small work has been dyed, discharged, overdyed, discharged, overdyed, screen printed, hand-painted, layered and stitched. It was exhibited as part of a show with the theme “Words” at the local library. It is a commentary on the impact of money on public discourse.
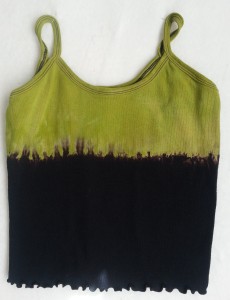
Gorgeous new Shibori Chic clothing stitched, discharged, and dyed? Check.
This Shibori Chic camisole was stitched, discharged, and overdyed and is a great project for a 4 hour class.
E-newsletter sent? Check.
There is lots to do to get ready for the quilt show. I still have to quilt a few small pieces, and tag and package the merchandise, but I am almost ready for the big show this weekend. The quilt show is always so much fun. I am so looking forward to hanging out with my friend Patricia Hasting-Sargent and talking to people about my work. Will I see you there?
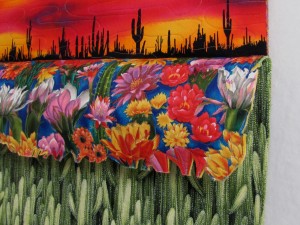
I have just finished working up two class samples for a 3D Quilt class I am developing. My brain has been working out the possibilities for different types of 3D projects for beginning art quilters, or those who work with commercial fabrics. The fabrics for both these projects were lurking in my stash. I can’t believe how well the landscape quilt fabrics work–they are not even from the same line…. The possibilities for creative embellishments are endless!
I think either one of these would make a good class project, don’t you?
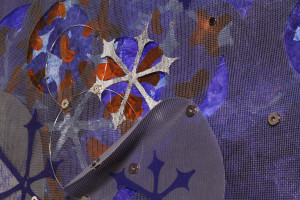
Samarium 62: No Relation. This piece is part of the Studio Art Quilt Associates’ Radical Elements invitational exhibition. A photo of the entire work is embargoed until its debut exhibition in May 2014. It is made from materials other than fabric and thread, and ‘quilted’ with magnets. The piece overlaps two series: Samaras and Circlesss.