Category: Quilting Tips

Quilting Tip #7: Hot Stuff and Idiosyncrasy

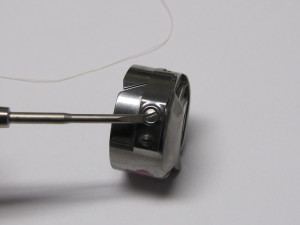
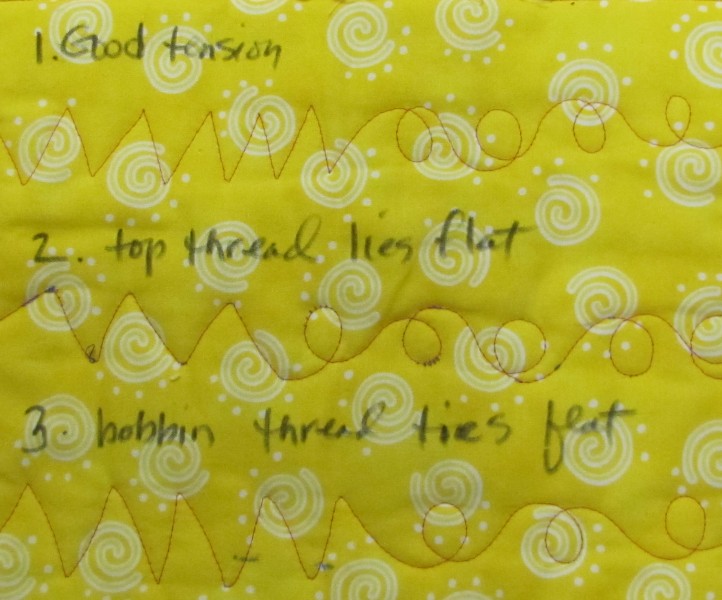
Who knew?  Thread shredding can also be caused by an overheated needle.  You may find that some of the lustrous, beautiful, finer trilobal polyester threads (and yes, I am talking about Rainbows here, among others) will shred while you are going at high speeds.  If this is happening to you, get your needle going at top speed for a good while while threaded, then stop the machine and touch your needle.  Is it very hot?  That may be your culprit.

You have a few options.  One is slowing your machine down–both you, if you have a stitch regulator, and the machine, if you are using a high ‘cruise’ speed.  Increasing your stitch length can help (longer stitch length = fewer stitches = slower speed).   That’s easy to say, not so easy to do.

Another option is to switch to cotton or silk thread, which won’t be quite as affected by higher temperatures/speeds.

It also helps to understand that this problem will be worse stitching from right to left–and especially from front right to back left–as you face the machine.  It is just one of those idiosyncrasies of design that can make you idiosyncrazy.  (Hey, I think I just made up a new word!  def:  adj., both idiotic and crazy simultaneously)  So, avoid stitching towards the left for long periods.  You can try stitching a line from left to right, ending the stitch line, and starting the next one left to right again (instead of stitching right to left).

What makes you idiosyncrazy about quilting?  I will try to answer it in a future post!


Quilting Tip #6: The Dreaded Thread Shred

Is your top thread shredding, as opposed to snapping cleanly at the end?  This can be caused by many things.  If you have broken a needle recently, your machine could be out of time.  In order to accomplish the magic of a perfect stitch, a whole lot of pieces-parts (needle, threads, hook, etc.) need to come together at exactly the right time in exactly the right place in relation to each other.  It’s mind-boggling, really.  Then a miracle happens:  a stitch.

Breaking a needle, especially with a longarm, can cause your machine to go ‘out of time.’  When this happens, your thread will shred all over the place.  This is not a happy occasion!

Some longarmers learn to re-time their machines themselves (see your manufacturer for instructions).  Show-offs!  I bite the bullet and call my local sewing machine repairman and pay for the house-call.  Thank goodness for Jerry at Cathey’s Vac and Sew.  He saves me time, frustration, and I don’t have to dismantle my machine to bring it in.  Worth every penny.

Do you have a favorite video that shows how a stitch is made?  Please let me know!  And stay tuned tomorrow for more reasons why thread can shred….

Quilting Tip #5–Blasphemy!

Another tip for the bobbin case:  If  you are having inexplicable problems with too-high bobbin tension, try carefully running a very fine straight silk pin under the thread guide of the bobbin case, from back to front.  Lint will frequently build up here and it is usually impossible to see without removing the guide and/or removing the bobbin from the case and looking inside.

Yes.  I admit that this is an unorthodox way to remove lint.  Bless me father, for I have sinned…  But it is the most surefire way to remove all the lint I can’t see.  I have never had a problem ruining a bobbin case this way, and I have used this method literally thousands of times.

Okay, you must be VERY careful not to scratch the metal of the bobbin case along the thread path.  (This is why you need a very fine pin.)  Start at the back of the thread guide, where there is a slight gap between the guide and the bobbin case.  Pull the pin underneath the guide along its length.  If you have been using a low-mid quality thread, you will have quite a lint ball, as in the photo.  You will have less if you have been using an extra long staple Egyptian cotton, for instance.

This series of photos shows you how to clear lint from your bobbin case.

Here the bobbin case is removed from the machine.  We can suspect there is some serious lint inside based on what we see here.
Here the bobbin case is removed from the machine. We can suspect there is some serious lint inside based on what we see here.


Oh, yeah.  There's a big clot of lint where the thread meets the metal.  We didn't see that from the outside of the bobbin case, did we?
Oh, yeah. There’s a big clot of lint where the thread meets the metal. We didn’t see that from the outside of the bobbin case, did we?


Now here is the blasphemy:  insert a fine IBC silk pin where there is a gap between the adjustable guide and the bobbin case.
Now here is the blasphemy: insert a fine IBC silk pin where there is a gap between the adjustable guide and the bobbin case.
Pull the pin along the guide.  It will drag the lint with it.  Sometimes you need to do this 2x to get all the lint.
Pull the pin along the guide. It will drag the lint with it. Sometimes you need to do this 2x to get all the lint.


Now the big clot is gone.  You need to check the other nooks and crannies; blow, brush, or tap the remaining lint from the case and you are good to go.
Now the big clot is gone. You need to check the other nooks and crannies; blow, brush, or tap the remaining lint from the case and you are good to go.

Can you forgive me?

Quilting Tip #4 Double, double, no oil means trouble….

If your machine sounds like it is playing Jingle Bells for you, you should really oil your hook.  Oil it at least every other bobbin.  Once oiled, run your machine with thread for 6-10 inches of stitching on a scrap of fabric or batting.  You will notice that your thread picks up the excess oil, and you do not want that on your quilt.  If you do get oil on a quilt, pat a bit of cornstarch on the stain along the stitch line.  Leave it for at least an hour (overnight is fine, too) and then brush it away.  You will be quite relieved to find the oil spot has disappeared….

Add a drop of oil right here:

Here, the hook has been removed from the shaft for easy viewing.  You want to oil the 'tongue' right where indicated, so it glides smoothly in the groove.  Rotate your flywheel to get the oil right where you need it.
Here, the hook has been removed from the shaft for easy viewing. You want to oil the ‘tongue’ right where indicated, so it glides smoothly in the groove. Rotate your flywheel to get the oil right where you need it.

Oh, and uh, my apologies to Shakespeare…

Quilting Tip #3…and the lies they tell

Ladies, we have been lied to all these years:  THE WORLD WILL NOT COME TO AN END IF YOU ADJUST YOUR BOBBIN TENSION.  This goes for longarm, midarm, and domestic sewing machines.  I don’t know why this lie got started.  Did it have something to do with sexism?  Were women considered too hairbrained to handle a screwdriver?  Perhaps adjusting bobbin tension would adversely affect the ovaries?

I do not blame Mrs. Gaska, my 7th grade home economics teacher, for telling me this lie.  I am sure ‘they’ lied to her too.  Feel free to use an eyeglass screwdriver to make incremental adjustments to your bobbin tension (righty-tighty, lefty-loosey), especially if you tend to run different weight threads in your bobbin.

Adjust the screw here with a screwdriver from an eyeglass repair kit.

As a general rule, I run my bobbin thread as loose as possible on my longarm–much looser than the manufacturers’ typical recommendation.  This means I am less likely to have too-tight tension on the back of the quilt, where I can’t easily see it until I have quilted way too many stitches to want to remove.

What lies have the quilt police told you?


Quilting Tip #2: How Quilting is like Voting

Okay, now for some practical information.  Thread tension is the bane of every quilter.  It is important because it affects the long-term durability of your quilt, and is an important part of quilt show judging criteria (more on that in another post).  If your tension is unbalanced, those stitch lines are not as secure as they should be.  If the thread that is lying flat breaks, the stitches will loosen and fall out.

Getting and keeping good thread tension is your goal and some days will be better than others on that score.  It helps to have a basic understanding of how thread tension works.  The folks at Superior Threads have a TON of great information, including this diagram on the tug of war between top and bottom thread tension.  (FYI, I do not get paid by Superior Threads, but I am a big fan.  They carry a wide variety of very high quality thread.)

Note that BALANCED tension is what is important, and the only way to know if your tension is balanced is to look for top thread pulling to the bottom, or bobbin thread pulling to the top of your quilt.  Run your finger along the stitch line.  Does it feel smooth, or bumpy?  If it is bumpy, or you hear your fingernail running along the stitch line, you need to adjust your tension.

Here’s a little sample quilt I use in my classes showing balanced and unbalanced thread tension:

This sample shows how balanced tension looks from the top of a quilt.

Notice the ‘eye lashes’ on stitch line 2?  Bad, bad, unbalanced tension!

Notice how stitch line 3 looks a lot like the balanced tension on stitch line 1?  That’s because the bobbin thread tension is too high/tight and the top thread is pulling to the back of the quilt.  You can’t see the problem while you are quilting, only when you stop to look at the back.  This is the most diabolical of all tension problems.

So the lesson for today is, test for tension just like you vote… early and often.

What is your best test for stitch tension?

Quilting Tip #1

Homage
This quilt won the 2012 Longarm Quilting prize for a Wall-Sized Quilt at AQS in Paducah

I am a mixed-media textile artist and longarm quilter in Tucson, Arizona.  Since 2004, I have quilted over 1900 quilts for clients and myself.  My quilt Homage won the 2010 Handiquilter Longarm Workmanship Award at the American Quilters’ Society show in Paducah. In honor of National Quilting Month, I will be blogging a quilting tip each day.

Tips will range from the technical to the artistic, from loading a quilt on a longarm machine to how to quilt for show.  They are not in any particular order.  Some have videos or photos attached to them.  I will share everything I have learned in ten years and hope these tips help you, whether you are an art quilter, traditionalist, whether you quilt on a longarm or domestic machine.  Enjoy, and share it freely (just ‘spell my name right’), and please share your own tips as well….

Tip #1:  Practice, practice, practice. Okay, so this first tip is not very sexy, but it needs to be said nonetheless.  I took my first longarm quilting class from Nicole Webb one week after I got my quilting machine.  Obviously, I had the figurative training wheels in that class.  Nic–and everyone else–was really nice, but of course I was not happy with my quilting compared to the rest of the group.  When the two-day class ended, I vowed I would learn how to do a pretty feather if it killed me.  For two and a half days straight (that’s 20 hours) I did nothing but practice feathers.  First on a white board, and when that got boring, I went to the quilt machine.  It took 20 intense hours (and a bolt of muslin) as a total newbie to master a nice basic feather, which is admittedly a pretty complex shape.  

If I had had more experience with doodling simpler shapes, or any experience drawing, it would not have taken as long.  It  would surely have taken longer than 20 hours if I had practiced only one hour per day.   I have had people look at my work in quilts like Homage and assume it was done by computer because it is so ‘perfect.’  When asked how long a piece like this takes to make, I say “About 4 weeks, plus 10,000 hours of practice!”  A skill like quilting needs to get in your brain, and in your muscle memory.  Keep this in mind as you try to master any new skill.  

Once you have mastered the skill, keep practicing, even if it is only 20 mins every other day.  If you don’t use it, you will lose it.

How long did it take you to master quilting?