Use a whiteboard to practice quilting designs while you are away from your sewing machine. It is cheaper and more earth-friendly than paper and pencil or needle and thread. And the muscle memory is the same.
Use a whiteboard to practice quilting designs while you are away from your sewing machine. It is cheaper and more earth-friendly than paper and pencil or needle and thread. And the muscle memory is the same.
And now let’s turn to the ART of quilting, that is, how to make our chosen quilting design look the way we want it to. I was never trained as an artist. One of the best things I ever did to improve my quilting skills was take a beginning drawing class at a local non-profit, The Drawing Studio.
There I learned that one key to drawing what I see is to LOOK at what I am seeing instead of assuming, “I know what a fill-in-the-blank looks like” so I will draw it like so. The drawing class really helped me focus on the looking/analyzing before drawing/quilting. If you have not taken a drawing class, now is the time!
What have you done to improve your quilting skills?

A word (okay, a lot of words) about choosing thread: some quilters are purists and want to use only cotton thread. This is fine (though not mandatory) if you are going for an ultra-traditional look. But be aware that our grandmothers used cotton thread because that was the only choice they had. Our foremothers were innovators just like us. They loved the new products on the market back then. They would have loved all the thread choices we have today.
I choose my thread based on the look I want and the quilt’s ultimate function. I take into consideration color, variegated v. plain, heavy v. fine, luster v. matte, and utility v. art. The thread content matters little as a general principle.
Quilters have been told a myth that polyester thread ‘cuts’ cotton fabrics. WRONG. Cotton is an organic material. It rots. Polyester thread and fabrics will stay bright and strong long after cotton fabrics have faded and shredded.
You just need to look at a vintage 1960s utility quilt to see the truth of that statement. The cotton fabrics will be faded and worn next to polyester and cotton/poly fabrics that look like they came off the bolt yesterday. It is the same with thread.
I once had a client tell me that a quilt she had made for her grandchild (quilted with cotton threads) fell apart after 2 years because the kid’s day care facility required a weekly sanitizing (read ‘bleaching’) of all blankies. She now makes sure to use a heavy polyester quilting thread for quilts that are going to be washed frequently.
A bonus with polyester thread and silk threads: less lint. Less lint = fewer tension problems. Can’t argue with that….
The trade-off with polyester is that while it is durable and you can run a finer thread through your machine than you can with cotton, cotton thread does not react to a hot/fast needle speed like polyester thread does.
So, I use all kinds of threads: fine (silk or polyester) for dense quilting, and cotton or polyester for utility quilts and less densely quilted work.
My motto: use the right thread for the quilt. What is your favorite? A luscious variegated? Lustrous silk? Hand-dyed cotton? Tell me!
Another cause of top thread shredding can be caused by a broken needle: a ‘bur’ on the thread path. A ‘bur’ is a tiny bit of displaced metal, made when your needle hits anything but the hole in the throat plate it is supposed to go through. It is when your formerly pointy needle gets flattened at the end. That metal goes somewhere, and it becomes a bur.
Yes, this is just as bad as a bur under your saddle….
You will find the bur on the tip of your needle, and whatever your needle hit. If the bur is on your needle, replace it. If your thread path has a bur on it, you need to buff that out.
Over time, and after a needle break, a bur can form anywhere along the thread path, so you need to search carefully, feeling along the thread path with a nylon stocking over your finger to see if it snags anywhere.
If the stocking snags, you know you have a bur. Buff out the bur with a fine grit (800 or so) sandpaper.
Happy trails!
Is your top thread shredding, as opposed to snapping cleanly at the end? This can be caused by many things. If you have broken a needle recently, your machine could be out of time. In order to accomplish the magic of a perfect stitch, a whole lot of pieces-parts (needle, threads, hook, etc.) need to come together at exactly the right time in exactly the right place in relation to each other. It’s mind-boggling, really. Then a miracle happens: a stitch.
Breaking a needle, especially with a longarm, can cause your machine to go ‘out of time.’ When this happens, your thread will shred all over the place. This is not a happy occasion!
Some longarmers learn to re-time their machines themselves (see your manufacturer for instructions). Show-offs! I bite the bullet and call my local sewing machine repairman and pay for the house-call. Thank goodness for Jerry at Cathey’s Vac and Sew. He saves me time, frustration, and I don’t have to dismantle my machine to bring it in. Worth every penny.
Do you have a favorite video that shows how a stitch is made? Please let me know! And stay tuned tomorrow for more reasons why thread can shred….
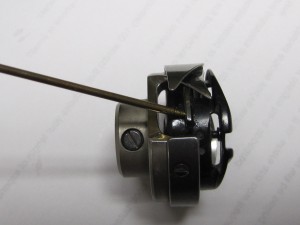
If your machine sounds like it is playing Jingle Bells for you, you should really oil your hook. Oil it at least every other bobbin. Once oiled, run your machine with thread for 6-10 inches of stitching on a scrap of fabric or batting. You will notice that your thread picks up the excess oil, and you do not want that on your quilt. If you do get oil on a quilt, pat a bit of cornstarch on the stain along the stitch line. Leave it for at least an hour (overnight is fine, too) and then brush it away. You will be quite relieved to find the oil spot has disappeared….
Add a drop of oil right here:
Oh, and uh, my apologies to Shakespeare…
Ladies, we have been lied to all these years: THE WORLD WILL NOT COME TO AN END IF YOU ADJUST YOUR BOBBIN TENSION. This goes for longarm, midarm, and domestic sewing machines. I don’t know why this lie got started. Did it have something to do with sexism? Were women considered too hairbrained to handle a screwdriver? Perhaps adjusting bobbin tension would adversely affect the ovaries?
I do not blame Mrs. Gaska, my 7th grade home economics teacher, for telling me this lie. I am sure ‘they’ lied to her too. Feel free to use an eyeglass screwdriver to make incremental adjustments to your bobbin tension (righty-tighty, lefty-loosey), especially if you tend to run different weight threads in your bobbin.
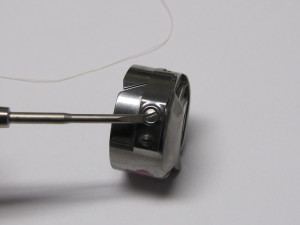
As a general rule, I run my bobbin thread as loose as possible on my longarm–much looser than the manufacturers’ typical recommendation. This means I am less likely to have too-tight tension on the back of the quilt, where I can’t easily see it until I have quilted way too many stitches to want to remove.
What lies have the quilt police told you?
Okay, now for some practical information. Thread tension is the bane of every quilter. It is important because it affects the long-term durability of your quilt, and is an important part of quilt show judging criteria (more on that in another post). If your tension is unbalanced, those stitch lines are not as secure as they should be. If the thread that is lying flat breaks, the stitches will loosen and fall out.
Getting and keeping good thread tension is your goal and some days will be better than others on that score. It helps to have a basic understanding of how thread tension works. The folks at Superior Threads have a TON of great information, including this diagram on the tug of war between top and bottom thread tension. (FYI, I do not get paid by Superior Threads, but I am a big fan. They carry a wide variety of very high quality thread.)
Note that BALANCED tension is what is important, and the only way to know if your tension is balanced is to look for top thread pulling to the bottom, or bobbin thread pulling to the top of your quilt. Run your finger along the stitch line. Does it feel smooth, or bumpy? If it is bumpy, or you hear your fingernail running along the stitch line, you need to adjust your tension.
Here’s a little sample quilt I use in my classes showing balanced and unbalanced thread tension:
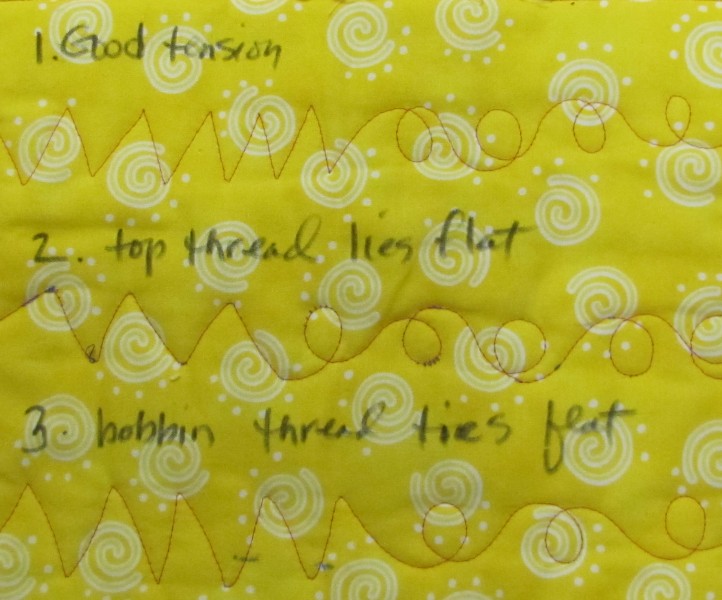
Notice the ‘eye lashes’ on stitch line 2? Bad, bad, unbalanced tension!
Notice how stitch line 3 looks a lot like the balanced tension on stitch line 1? That’s because the bobbin thread tension is too high/tight and the top thread is pulling to the back of the quilt. You can’t see the problem while you are quilting, only when you stop to look at the back. This is the most diabolical of all tension problems.
So the lesson for today is, test for tension just like you vote… early and often.
What is your best test for stitch tension?
I am a mixed-media textile artist and longarm quilter in Tucson, Arizona. Since 2004, I have quilted over 1900 quilts for clients and myself. My quilt Homage won the 2010 Handiquilter Longarm Workmanship Award at the American Quilters’ Society show in Paducah. In honor of National Quilting Month, I will be blogging a quilting tip each day.
Tip #1: Practice, practice, practice. Okay, so this first tip is not very sexy, but it needs to be said nonetheless. I took my first longarm quilting class from Nicole Webb one week after I got my quilting machine. Obviously, I had the figurative training wheels in that class. Nic–and everyone else–was really nice, but of course I was not happy with my quilting compared to the rest of the group. When the two-day class ended, I vowed I would learn how to do a pretty feather if it killed me. For two and a half days straight (that’s 20 hours) I did nothing but practice feathers. First on a white board, and when that got boring, I went to the quilt machine. It took 20 intense hours (and a bolt of muslin) as a total newbie to master a nice basic feather, which is admittedly a pretty complex shape.
If I had had more experience with doodling simpler shapes, or any experience drawing, it would not have taken as long. It would surely have taken longer than 20 hours if I had practiced only one hour per day. I have had people look at my work in quilts like Homage and assume it was done by computer because it is so ‘perfect.’ When asked how long a piece like this takes to make, I say “About 4 weeks, plus 10,000 hours of practice!” A skill like quilting needs to get in your brain, and in your muscle memory. Keep this in mind as you try to master any new skill.
Once you have mastered the skill, keep practicing, even if it is only 20 mins every other day. If you don’t use it, you will lose it.
How long did it take you to master quilting?