Category: Quilting Tips

Quilting Tip #31: Some Perspective

This last quilting tip calls for some perspective on quilt show judging.

Quilt show judges have a very difficult job, and no one will get rich doing it (one told me she accepted payment for judging county fair quilts in pie!).  They can assess over 300 quilts in 2 consecutive eight-hour days.  That’s enough to make anyone cross-eyed.  While they honestly strive for objectivity, judges are human beings with biases and preferences.  Since only one quilt can win Best in Show, someone is ALWAYS unhappy with EVERY decision a judge makes.

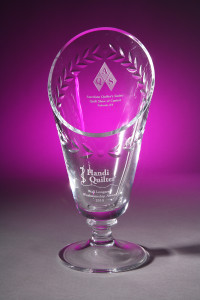
When I submitted Homage to my local guild show, it won a blue ribbon in its category, but did not win the professional quilting ribbon here in Tucson.  From there I submitted it to several state and national shows, where it was  juried in but never got more than an honorable mention.  Its last stop was Paducah, and I was THRILLED that it got accepted but figured that would be the end of it because of its showing elsewhere.

Imagine my surprise when I learned that it had won one of the biggies!  Now, Homage faced different competition and different judges in each show, so one explanation for the Paducah ribbon was that Homage was up against some really crummy quilts that year.  I prefer to think that it won because the judges were the most astute, brilliant, and tasteful on the planet…but whatever the reason for the Paducah win, I have learned that judging–and jurying–is really a roll of the dice.  Always take it as it comes and remember that you asked for it–the judging process is voluntary.

So, are you feeling lucky?

Yes, this is my license plate!

Quilting Tip #30:

How do you learn more about quilt show judging?  

  • Ask your quilt show committee how quilts will be judged for the show.
  • Surf the ‘net for criteria from other shows (know that criteria can differ from show to show and judge to judge).
  • Volunteer to help during the judging process at your show so you can see and hear the process for yourself.
  • Attend workshops given by judges about the criteria they use.
  • Read books and articles on the subject .

Once you know about some of the criteria for judging, go to a local show and see how the ribbons match the quilts in your estimation (because you generally can’t see the back of a quilt at a show, or all the other quilts in its category, you will not have the same perspective as the judges).  Evaluate  your own work and ask yourself where you could improve your technique.  Take a class at a local shop from an award-winning teacher to brush up on the basic skills you need to perfect.  And when you are ready to quilt for show judges, go for it!

A word to the art quilters out there:  Know that your work will primarily be judged on quilting criteria and not artistic merit.  Some (but certainly not all) strikingly original work that would do very well in art venues will be judged harshly when compared to quilts.  Many art quilters choose not to place their work in quilt shows for this reason.  Other art quilters take the opposite tack and try to push the boundaries of show quilting (I’m reminded of some  Warren Zevon lyrics, where he sings about being a ‘thorn trying to find a side’)…it just depends upon your perspective and where you are in your career and whether you want to shake things up a little at the local guild.

So what experiences have YOU had having your quilts judged?

My quilt Homage won this award from the American Quilter's Society in 2012.
My quilt Homage won this award from the American Quilter’s Society in 2012.

Quilting Tip #29: Judgement Day, cont’d.

I am one of those people who hate to follow the rules blindly.  Tell me to jump, and I will not ask how high?  I will tell you I am busy and life is just too short to deal with capricious requests.

Did you ever wonder how quilt show judges came up with all those picky, seemingly arbitrary rules for judging quilts?  As in, “If the binding looks good, is straight,  even, and securely stitched, why do we care if it is full of batting?” (roll eyes here for emphasis).

I asked this question of an AQS certified judge who gave me this answer:  We know from looking at antique quilts that those with full, evenly stuffed bindings wear best over the years.

And a light bulb went off in my brain:  There is method in their madness.  The judging criteria are not arbitrary at all.  They are designed to ensure that the most beautiful quilts last as long as possible.  Well, that is a goal we can all support, isn’t it?  So while I might not like all those rules, I can understand why those rules exist.  They are not arbitrary….  And because I want my work to last, I try to play by those pesky rules, whether my quilt will be judged or not.

detail, 'Homage'
detail, ‘Homage’


Quilting Tip#28: Judgement Day

On quilt show judging:    Having your quilt judged in a show is not for everyone.  Many of us make quilts for those we love and the love of quilting.  These are WONDERFUL reasons to quilt, and you don’t need anyone nitpicking over the pointiness of your points.

Having your work judged is strictly voluntary and a choice YOU get to make.  There is no need to subject yourself to  the pressures of show quilting unless you:

  • Wonder how your workmanship stands up to others in your quilting community,
  • Would like some external validation of all your hard work, and/or
  • Are quilting for others who want their quilts judged.

Quilts are typically judged on over 50 criteria.  Keep this in mind when reviewing judge’s comments.  If you are a fabulous quilter, but your piecing is not so great, you may not get a ribbon in your category.  The judging criteria depends both on the guild instructions to the judge(s), and the show judge(s) themselves.  They can be categorized into these areas:

  1. Piecing (i.e., are your points pointy?
  2. Applique (i.e., are your curves smooth?)
  3. Quilting (i.e., is your stitch length consistent?)
  4. Binding (i.e., is it straight?)
  5. “Other” (i.e., are embellishments secure?)

and –sometimes–

6. Design (i.e., is the composition strong?)

Now you know what judges are looking for.  Tomorrow, I’ll write about why.

My quilt Homage won this award from the American Quilter's Society in 2012.
My quilt ‘Homage’ won this award from the American Quilter’s Society in 2012.

Quilting Tip #26: The Five Shapes

The art part of quilting came more easily to me when I read Sally Terry‘s book Pathways to Better Quilting and learned about the five shapes….

Did you know all line drawings are made up of lines in these five shapes:

  1. straight line,
  2. arc,
  3. S curve,
  4. spiral, and
  5. loop

in different combinations?  Look at a line drawing or quilting design you want to reproduce and analyze it by breaking it down into the shapes that apply.  Repeat the shape names to yourself as you quilt/draw the design.

Understanding this simple concept will give you the courage to try complex shapes without marking.  It was a major breakthrough for me.

What worked for you?

"Pathways to Better Quilting," by Sally Terry.
“Pathways to Better Quilting,” by Sally Terry.

Quilting Tip #25: The Art of Quilting

And now let’s turn to the ART of quilting, that is, how to make our chosen quilting design look the way we want it to.  I was never trained as an artist.  One of the best things I ever did to improve my quilting skills was take a beginning drawing class at a local non-profit, The Drawing Studio.

There I learned that one key to drawing what I see is to LOOK at what I am seeing instead of assuming, “I know what a fill-in-the-blank looks like” so I will draw it like so.  The drawing class really helped me focus on the looking/analyzing before drawing/quilting.  If you have not taken a drawing class, now is the time!

What have you done to improve your quilting skills?

'Lucina Lighting the Way,' detail
‘Lucina Lighting the Way,’ detail

Quilting Tip #24: Stabilizing the Quilt

Stabilizing the quilt:  This is pretty straightforward for most quilts.

If you are using a domestic or George-type machine, you will want to pin or baste the top, batting and backing together.  A longarmer can do this for you quickly and at a very reasonable price.

Like many longarmers, I float the quilt top, which means I attach the backing only to the machine, layer on the batting and top and baste those edges as I go.  It’s fast, and I save time pinning, which is my least favorite part of quilting.

The only time I have had a problem doing it this way is with large medallion quilts.  You know, the kind where the borders get increasingly smaller as you approach the center.  I  have sometimes ended up with pleats on the backing of larger quilts.

To avoid this, I take a tip from quilter extraordinaire Sharon Schamber and baste a stitch line across the width of the quilt each time I advance it, before that section is quilted.  Works like a charm every time, no matter how densely I quilt the sections–no pleats!

How do you load your quilts?

Quilting Tip #23: Playing by the Rules

When I first got my longarm machine, I spent a week at Longarm University and signed up for as many classes as possible.  It was a great experience, and I learned a LOT.  There were three classes on machine maintenance by three instructors, and I attended every class.  I learned such gems as:

  • Never use a brush to clean out your bobbin lint; always blow it out with your breath.  And:  
  • Never use your breath to clean out your bobbin case; use canned air.  And, of course,
  • Never use canned air, always use a brush.  

What’s a newbie to do?  Advice like this can be very disheartening for a beginner.  Just be aware that everyone has little ‘good luck charms’ that seemed to work for them in the past, and so they stick to them.  Take the advice with a grain of salt, and remember it is okay to try something else if that doesn’t work for you.

What conflicting ‘rules’ have you heard?

Quilting Tip #22: Back It Up

Back it up:  Quilting is the only art form that judges the back of a work, so pay attention! Here are some tips for dealing with the quilt back:

Make your backing seams 5/8″  and press them open.  This makes the seams more secure and will allow them to lie flat during quilting.  Be sure your quilt back is square:  90* angles and straight sides when longarming.  Backing that is on the straight or lengthwise grain is best for quilts that will hang on a wall.

Be sure to arrange the quilt top on the backing so that the back seams are NOT centered.  We know that quilts are usually folded in the center with the back out.  This means the seam (the weakest part of the back) is on an outside fold, and we want to avoid that if possible.  It will wear quicker on a fold line.

Avoid heavily pieced backs.  It is difficult to center the backing exactly in relation to the top, and biases can lead to pleats on the back.

When you load your quilt on the longarm, your long backing seams should be parallel to your rollers if possible.  This will prevent sagging of the backing between the seams if seams are perpendicular to the rollers.

I’ve got your back.  Do you have any tips for backing your quilt?

Quilting Tip #21: Six Feet Under

Invisible Starts and Stops Part II:  Burying the thread ends.

My first show quilt was my own bed quilt and it has been washed several times (sadly, cats will make you do that to a quilt).  The thread ends have never come loose and I attribute that in part to burying the threads.  When you bury thread, you put the knot between the quilt layers.  It doesn’t get catch or rub against anything.

To do this, you need a highly specialized tool, the self-threading needle (available at Joann’s).  Instead of a closed eye, the needle has a V at the top, which allows you to slip the thread ends through the V (your thread ends will have to be longer than your needle).  You can see the notch above the eye of the needle the photo below.

These needles are usually available at local quilt shops and big box craft stores.

Then you pull your needle through the fabric starting where the thread ends come out of the fabric.  In some cases, when it is hard to get your needle through the fabric, use a hemostat ($3 at the hardware store) to grab the needle and pull it through.

A link to a short video on burying the threads is here.


Quilting Tip #20: Your Cloak of Invisibility

Invisible Stops and Starts Part I:  If you are quilting for show, this is a critical skill to master.  It is one of the criteria that judges use to separate the wheat from the chaff.  You will want to avoid making a ‘wad’ of stitches when you start a stitch line.  It is a bit more time-consuming, but we all know this art form of ours is not a speed sport.  You will want to train yourself early to do this so it becomes a habit.

My preferred method for invisible starts:

1.  First, if possible, make your start (or stop) at a place on the quilt where it will be the least noticeable.  This may be at a seam line, or where the color on a certain fabric changes, or on a particularly busy fabric.

2.  Hold both bottom and top thread ends in your hand while taking several TINY (think one thread-width) stitches with your single stitch button (longarm).  Keep the thread in your hand taut as you do this.  Your hand will move with the thread as it remains taut and slips through the fabric.  When the thread stops moving (at about 3 tiny stitches), you know the end is secure in the fabric.  I stitch 2 more tiny stitches just to be sure.   A video of this technique is here.

3.  Now, you can clip your thread end, if you wish, or bury the thread.

To make end your stitchline invisibly, you can end your stitchline with several tiny stitches.  If your bobbin thread has run out, you don’t have this luxury.

In that case, remove the last remaining 3-4″ of stitches.  Go back far enough so that your stitch line ends at an inconspicuous place (at a seam or where the color changes on your fabric).  Tie a square knot, and bury the thread.

Tomorrow:  bury threads, or Six Feet Under.

Quilting Tip #19: Pressing Matters

Pressing matters: We are taught early when we learn to piece a quilt top to press our seams in the opposite direction.  This allows us to ‘butt’ our seams for precise, pointy points and square angles.  I call this pressing for construction, and it make perfect sense when you are piecing.

That same pressing, however, means that your seam ‘ditches’ will alternate all over your quilt.  Your Stitch In the Ditch (SID) lines will have to alternate from your blocks to your sashing, from one fabric to another.  This can be a real headache when you layer the top for quilting.

Before you quilt, consider pressing all your blocks’ seams either in the direction of the the blocks, or to the sashing, whichever you prefer.  You get extra points if you press your seams to the darker fabric, where they won’t show on the light areas of the front.  This will allow you to use one color thread and SID on the block or sashing fabric, whatever you choose.  So you want to press your top for quilting after it is finished.  It makes your quilting task that much easier.

7iron

Quilting Tip #18: Lint Happens

Lint happens.  You need to find the best way for you to clean lint from your bobbin area–this is crucial to maintaining good tension.  Lint that is not directly on the thread path but is ‘hanging around’ your bobbin area could become dislodged and cause tension issues, so be proactive and get rid of it before it becomes a problem.

One way is with a brush.  This can drive lint further into the works of your machine.  Some prefer blowing onto the bobbin mechanism.  This might cause water vapor to condense on your bobbin case, which can cause rusting if your machine is not used and oiled frequently.  Air cans and even air compressors are other alternatives.

It is worthwhile to note here that polyester and silk threads can almost eliminate lint problems (cotton fabric and batting also produce lint, but not as much as cotton thread).  An extra-long staple cotton thread like Superior’s King Tut brand will produce less lint than long staple cottons, too.

How do you get the lint out?  Leave a comment, I would like to know!

Quilting Tip #17: Skipping Not-So-Merrily Along

Skipped stitches?  Skipped stitches are a problem because they will catch on anything that moves across the quilt.

If you are quilting a batik quilt (or some other odd fabric), it is possible that your needle is not large enough to go through all the layers and seams of the dense fabric.  If this is your problem, you will have skipped stitches over seamed areas, but not in other areas.

Try increasing your needle size.  When I started using a #18 top stitch needle, I stopped having this problem on batik quilts.

You could also spray a light coating of silicon spray onto the backing (I do this onto the inside of the backing so that if at some point in the future the silicon discolors the fabric, it will not be on the top.   This is not my preferred method because I don’t like the idea of putting chemicals on a quilt, especially a customer’s quilt.

Check to see how tightly the quilt is stretched on your machine.  It should not be so taut that you could bounce a quarter on it!  Check by ‘poking’ the quilt from below with one index finger.  With your other hand, you should be able to grab the tip of your index finger through the quilt from the top.  If you can’t do this, loosen the quilt a notch or two.

Otherwise, check that your machine is threaded properly and the needle is installed correctly.  If that doesn’t work, check your timing.

Then you can skip along your merry way…


Quilting Tip#16: You Have to Kiss a Few Frogs

You have to kiss a few frogs….or rather, into every quilter’s life some ripping must fall.  Try as we might, there will always be days when we spend way too much time ripping stitches out (for you newbies, that is frogging = ripping, as in RIP-it, RIP-it).   It takes 3-10 times longer to remove stitches than it does to make them.  For this reason, it is really important to have a sharp seam ripper for the job.

Don’t try to do this job with your grandmother’s antique seam ripper from 1906.  You need something with a fine and very sharp blade, particularly if your stitches are small.  It is nice to have a slight curve to the blade–I find it helps to keep you from ‘stabbing’ your fabric as you remove stitches.  My current favorite is from Superior Threads.  At $30 it is a bit pricey, but lasts much longer than the cheaper ones….

The 2 seam rippers on the left work best for ripping out stitches.  The other work to cut thread.
The 2 seam rippers on the left work best for ripping out stitches. The other work to cut thread.


Quilting Tip #15–Manly Tools

My must-have specialized tool #372:  A ‘manly’ magnetized dish from the hardware store for my pins.  It’s huge, and sticks to various places on your machine when you need it to.  If you do spill pins, it makes picking them all up easier.

It is usually cheaper than the silly plastic pink things with a tiny magnet that craft superstores sell.  I also store my machine needles and screwdriver there, so they are convenient and easy to find for each machine.

This great little tool will stick to your rollers as you pin the quilt.

Quilting Tip#14: Stabilizing your Quilt

Stabilizing the quilt:  This is pretty straightforward for most quilts.  If you are using a domestic or George-type machine, you will want to pin or baste the top, batting and backing together.  A longarmer can do this for you quickly and at a very reasonable price.

Chemical/glue/fusible  basting is problematic because you are putting some kind of chemical on the quilt, and these have a tendency to gum up your needles.

Like many longarmers, I float the quilt top, which means I attach the backing only to the machine, layer on the batting and top and baste those edges down.  I quilt the area under the machine throat, advance the quilt, and baste again as I go.  The only time I have had a problem doing it this way is with large medallion quilts, where the borders get increasingly smaller as you approach the center.  I sometimes ended up with pleats on the backing of larger quilts.

To avoid this heartbreak, I took a tip from Sharon Schamber and baste a stitch line across the width of the quilt each time I advance it, before that section is quilted.  Works like a charm every time, no matter how densely I quilt the sections!

Quilting Tip #13: Taking the Lead

My least favorite part of the longarm quilting process is pinning the backing on the canvas leaders.  With my velcro leaders, I can pin the quilt back to the machine more easily, and even do it while I am waiting for my IntelliQuilter to finish a row on another quilt or am out of the studio entirely.

Zipper leaders are another option, but velcro allows you to make slight adjustments in quilt back tension while the quilt is on the machine.  Keep in mind that different leaders have different requirements that will affect the size backing you need to attach quilts to your machine.

There is yet another product on the market:  Leadermate.  Haven’t seen this one in action yet.  Have you?

For side clamps, there are options like Snappers.  I tried a similar product a few years ago, but it just didn’t last long before it split and was useless.  Also, when a client brings me a short back, my machine was in danger of sewing right through the plastic.  It did this a number of times, ruining my needle.  I ended up going back to the tried-and-true clamping method.

What do you use to attach a quilt to the longarm?

Quilting Tip #12: Keeping on the Straight and Narrow

Longarmers:  Want to be sure you have a straight edge along the top of the quilt, but don’t have a horizontal channel lock function on your machine?  Use a small C-clamp like this on the vertical track of your machine.  It will allow you to baste a stitch a long straight line on your batting for you to lay your quilt against.  With one straight edge, you can square the others accordingly.

Of course, you remove the clamp before quilting.

Note:  many great longarm machines do not have a channel lock feature on them.  The channel lock is made with magnets, which are heavy.  They add a lot of weight to your quilting machine, which may not be ideal for dense, custom quilting.

Yes, there are fancy laser lights that you can get, but this is cheap, easy, and you know you already have what you need in your garage.

The clamp is placed temporarily to allow a perfectly straight stitch line as a guide for your quilt edge.

Quilting Tip #11: So Many Choices, Myths, and Tradeoffs

These are just a few of the threads available on the market.

A word (okay, a lot of words) about choosing thread:  some quilters are purists and want to use only cotton thread.  This is fine (though not mandatory) if you are going for an ultra-traditional look.  But be aware that our grandmothers used cotton thread because that was the only choice they had.  Our foremothers were innovators just like us.  They loved the new products on the market back then.  They would have loved all the thread choices we have today.

I choose my thread based on the look I want and the quilt’s ultimate function.  I take into consideration color, variegated v. plain, heavy v. fine, luster v. matte, and utility v. art.  The thread content matters little as a general principle.

Quilters have been told a myth that polyester thread ‘cuts’ cotton fabrics.  WRONG.  Cotton is an organic material.  It rots.  Polyester thread and fabrics will stay bright and strong long after cotton fabrics have faded and shredded.

You just need to look at a vintage 1960s utility quilt to see the truth of that statement.  The cotton fabrics will be faded and worn next to polyester and cotton/poly fabrics that look like they came off the bolt yesterday.  It is the same with thread.

I once had a client tell me that a quilt she had made for her grandchild (quilted with cotton threads) fell apart after 2 years because the kid’s day care facility required a weekly sanitizing (read ‘bleaching’) of all blankies.  She now makes sure to use a heavy polyester quilting thread for quilts that are going to be washed frequently.

A bonus with polyester thread and silk threads:  less lint.  Less lint = fewer tension problems.  Can’t argue with that….

The trade-off with polyester is that while it is durable and you can run a finer thread through your machine than you can with cotton, cotton thread does not react to a hot/fast needle speed like polyester thread does.

So, I use all kinds of threads: fine (silk or polyester) for dense quilting, and cotton or polyester for utility quilts and less densely quilted work.

My motto:  use the right thread for the quilt.  What is your favorite?  A luscious variegated?  Lustrous silk?  Hand-dyed cotton?  Tell me!


Quilting Tip #10: When Bobbins Break Bad

Bobbin thread breaking?  This will usually happen with longarm machines that have the larger ‘M’ style bobbins and when your quilting design has a lot of changes in direction.  The problem is called backspin and it will give you heartburn.  It means the bobbin is running so fast, it spins too fast in the bobbin case when you change directions in your stitch line.  The heavier/larger your bobbin, the faster you are going, the more changes in direction, the more likely this problem will occur.

I hate when that happens.

I found I could eliminate this problem almost entirely with pre-wound bobbins (available–way it with me–at Superior Threads).  They are lightweight and don’t have the backspin that heavier metal bobbins do.  Note:  I have to peel away the side of the cardboard bobbin that faces me as I put the bobbin in the case in order to fit it into my A-1 machine.  I never had to do that for my Gammill until recently.

I also use this trick when I put pre-wound bobbins in my Bernina 930 for piecing, but I remove BOTH bobbin sides for the Bernina.  Experiment to find what works best for you.

Note:  Be careful with your bobbins.  Try not to drop them.  Both metal and cardboard can bend out of shape and will increase your bobbin tension.  Don’t get the cardboard kind wet with water or oil.  That can also distort the bobbin, too.

Tomorrow’s topic:  what kind of thread to use.

Quilting Tip #9: When Needle Meets Thread/Can this Relationship be Saved?

Before you begin quilting, you have to know if your needle and thread like each other.  Do they have a good relationship?  Can they play nicely?  Will they get along all the way through your quilt?  Or do they play nicely for a few inches, and then tear each other apart?

It is very important to follow the thread manufacturer’s recommendations (if they are offered) regarding needle size for the different threads you use.  For ‘quilting’ threads, which are thicker than most piecing thread, and metallics with a polyester core, a topstitch needle (sizes 18-21) will often be your best bet.  A size 18 will accomodate most, but not all, threads on the market.

If your needle has too small an eye, your top thread will shred.  If you are having this problem on either a domestic or longarm machine, get a larger needle.

As a bonus, the bigger your needle the less ‘deflection’ you will have.  Deflection is the tendency of the needle to flex while moving, especially when you are changing direction as you stitch.  It can mess with your stitch quality, too.

Some people (I am talking about you, my fellow Type As) notice that larger needles leave larger holes, and finer threads don’t fill those holes as nicely.  I suspect those people don’t wash their fabrics before quilting.  The sizing in fabrics make them papery and the holes won’t ‘heal’ as readily.

One reason I like Superior Threads is that they have a recommended needle size for EVERY thread they sell printed right on the thread cone for both home and longarm machines.  How convenient is that?

What size needle do you use?

Quilting Tip #8: Burs under your Saddle

Another cause of top thread shredding can be caused by a broken needle: a ‘bur’  on the thread path.  A ‘bur’ is a tiny bit of displaced metal, made when your needle hits anything but the hole in the throat plate it is supposed to go through.  It is when your formerly pointy needle gets flattened at the end.  That metal goes somewhere, and it becomes a bur.

Yes, this is just as bad as a bur under your saddle….

You will find the bur on the tip of your needle, and whatever your needle hit.  If the bur is on your needle, replace it.  If your thread path has a bur on it, you need to buff that out.

Over time, and after a needle break, a bur can form anywhere along the thread path, so you need to search carefully, feeling along the thread path with a nylon stocking over your finger to see if it snags anywhere.

If the stocking snags, you know you have a bur.  Buff out the bur with a fine grit (800 or so) sandpaper.

Happy trails!